Tracking Daily User Data in Django with django-user-visit
It can be tedious to figure out what data to track, create data models and build middleware for your Django project if you just want to collect some basic information about clients that connect to your web application . Fortunately, the library django-user-visit is a handy Django project that quickly handles all of this complexity for you. In this tutorial, we'll learn how to use django-user-visit in a new Django project to add daily visit data tracking to Django projects.
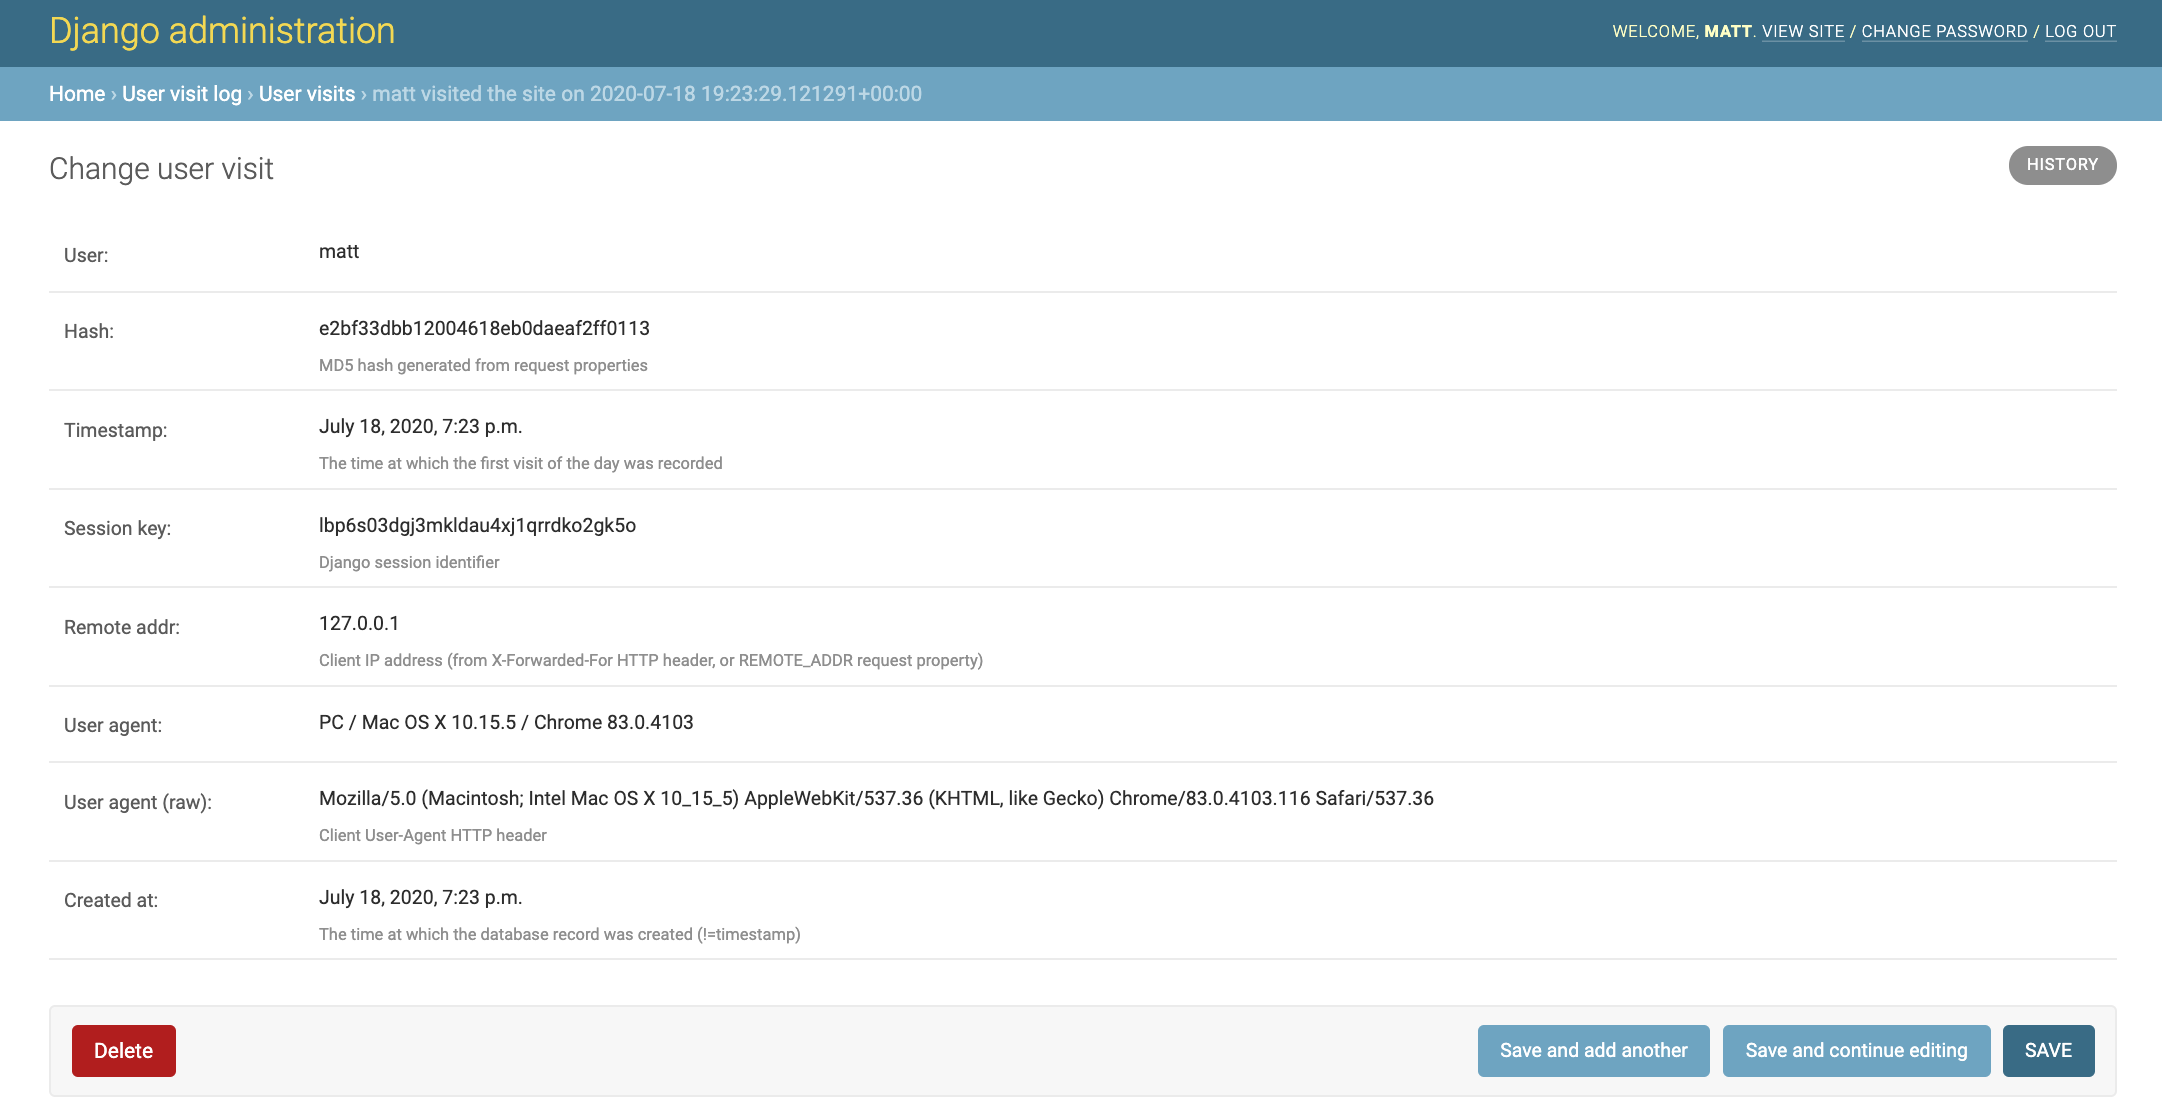
When we're done, we can view information like the following in the Django Admin:
Project Requirements
Ensure you have Python 3 installed, because Python 2 reached its end-of-life at the beginning of 2020 and is no longer supported. Preferrably, you should have Python 3.7 or greater installed in your development environment. This tutorial will also use:
We will use the following dependencies to complete this tutorial:
All code in this blog post is available open source under the MIT license on GitHub under the track-daily-user-data-django-user-visit directory of the blog-code-examples repository. Use the source code as you desire for your own projects.
Development environment set up
Change into the directory where you keep your Python virtual environments. Create a new virtualenv for this project using the following command.
Start the Django project by creating a new
virtual environment
using the following command. I recommend using a separate directory
such as ~/venvs/ (the tilde is a shortcut for your user's home
directory) so that you always know where all your virtualenvs are
located.
python3 -m venv ~/venvs/djuservisit
Activate the virtualenv with the activate shell script:
source ~/venvs/djuservisit/bin/activate
After the above command is executed, the command prompt will
change so that the name of the virtualenv is prepended to the
original command prompt format, so if your prompt is simply
$, it will now look like the following:
(djuservisit) $
Remember, you have to activate your virtualenv in every new terminal window where you want to use dependencies in the virtualenv.
We can now install the Django package into the activated but otherwise empty virtualenv.
pip install django==3.0.8 django-user-visit==0.4
Look for output similar to the following to confirm the appropriate packages were installed correctly from PyPI.
(djuservisit) $ pip install django==3.0.8 django-user-visit==0.4
Collecting django==3.0.8
  Using cached https://files.pythonhosted.org/packages/ca/ab/5e004afa025a6fb640c6e983d4983e6507421ff01be224da79ab7de7a21f/Django-3.0.8-py3-none-any.whl
Collecting django-user-visit==0.4
  Downloading https://files.pythonhosted.org/packages/23/ef/d3ec22c3a897192e267389d6ee59ce1858f5ede262b078f93211aff110e7/django_user_visit-0.4-py3-none-any.whl
Collecting sqlparse>=0.2.2 (from django==3.0.8)
  Using cached https://files.pythonhosted.org/packages/85/ee/6e821932f413a5c4b76be9c5936e313e4fc626b33f16e027866e1d60f588/sqlparse-0.3.1-py2.py3-none-any.whl
Collecting asgiref~=3.2 (from django==3.0.8)
  Using cached https://files.pythonhosted.org/packages/d5/eb/64725b25f991010307fd18a9e0c1f0e6dff2f03622fc4bcbcdb2244f60d6/asgiref-3.2.10-py3-none-any.whl
Collecting pytz (from django==3.0.8)
  Using cached https://files.pythonhosted.org/packages/4f/a4/879454d49688e2fad93e59d7d4efda580b783c745fd2ec2a3adf87b0808d/pytz-2020.1-py2.py3-none-any.whl
Collecting user-agents<3.0,>=2.1 (from django-user-visit==0.4)
  Using cached https://files.pythonhosted.org/packages/1b/be/82e4d20a7716d8e5de98b948edcecff9bb237e6718c3831bd92794fe9821/user-agents-2.1.tar.gz
Collecting ua-parser>=0.9.0 (from user-agents<3.0,>=2.1->django-user-visit==0.4)
  Using cached https://files.pythonhosted.org/packages/9d/22/4d16b08db329fd440eed366d35e4dd7195c9babb4ecac5218f28081522a2/ua_parser-0.10.0-py2.py3-none-any.whl
Installing collected packages: sqlparse, asgiref, pytz, django, ua-parser, user-agents, django-user-visit
  Running setup.py install for user-agents ... done
Successfully installed asgiref-3.2.10 django-3.0.8 django-user-visit-0.4 pytz-2020.1 sqlparse-0.3.1 ua-parser-0.10.0 user-agents-2.1
Our dependencies are installed so we can now create our project and start coding.
Creating the application
We have everything we need to start building our application.
We can use the Django django-admin tool to create
the boilerplate code structure to get our project started.
Change into the directory where you develop your applications. For
example, I typically use /Users/matt/devel/py/ for all of my
Python projects. Then run the following command to start a Django
project named djuservisit:
django-admin.py startproject djuservisit
Note that in this tutorial we are using the same name for both the virtualenv and the Django project directory, but they can be different names if you prefer that for organizing your own projects.
The django-admin command creates a directory named djuservisit
along with several subdirectories that you should be familiar with
if you have previously worked with Django.
Change directories into the new project.
cd djuservisit
Open djuservisit/djuservisit/settings.py. Add the user_visits
app and its middleware to settings.py by inserting the two
highlighted lines:
# djuservisit/djuservisit/settings.py
# Application definition

INSTALLED_APPS = [
    'django.contrib.admin',
    'django.contrib.auth',
    'django.contrib.contenttypes',
    'django.contrib.sessions',
    'django.contrib.messages',
    'django.contrib.staticfiles',
    'user_visit',
]

MIDDLEWARE = [
    'django.middleware.security.SecurityMiddleware',
    'django.contrib.sessions.middleware.SessionMiddleware',
    'django.middleware.common.CommonMiddleware',
    'django.middleware.csrf.CsrfViewMiddleware',
    'django.contrib.auth.middleware.AuthenticationMiddleware',
    'django.contrib.messages.middleware.MessageMiddleware',
    'django.middleware.clickjacking.XFrameOptionsMiddleware',
    'user_visit.middleware.UserVisitMiddleware',
]
Make sure you change the default DEBUG and SECRET_KEY
values in settings.py before you deploy any code to production. Secure
your app properly with the information from the Django
production deployment checklist
so that you do not add your project to the list of hacked applications
on the web.
Save and close settings.py.
Create a Django superuser
so you can access the Django Admin. Go to the base directory of this project
and use the manage.py file with the following command:
python manage.py createsuperuser
Follow the prompts and enter values for the username, email address and password that you want your local Django superuser to have. Next, we'll test out how this library works when a user visits a page created by our Django web app.
Testing django-user-visit
Let's test out our bare-bones application. Execute the development server with the following command:
python manage.py runserver
The Django development server should start up with no issues.
Watching for file changes with StatReloader
Performing system checks...

System check identified no issues (0 silenced).
July 19, 2020 - 13:01:41
Django version 3.0.8, using settings 'djuservisit.settings'
Starting development server at http://127.0.0.1:8000/
Quit the server with CONTROL-C.
Open a web browser and go to "http://localhost:8000".

That's the default page provided by Django in the absence of any other URLs to serve at the root URL, but it works for our purposes.
Go to the Django Admin by changing the URL in your browser to "http://localhost:8000/admin". The Django Admin login page will appear.
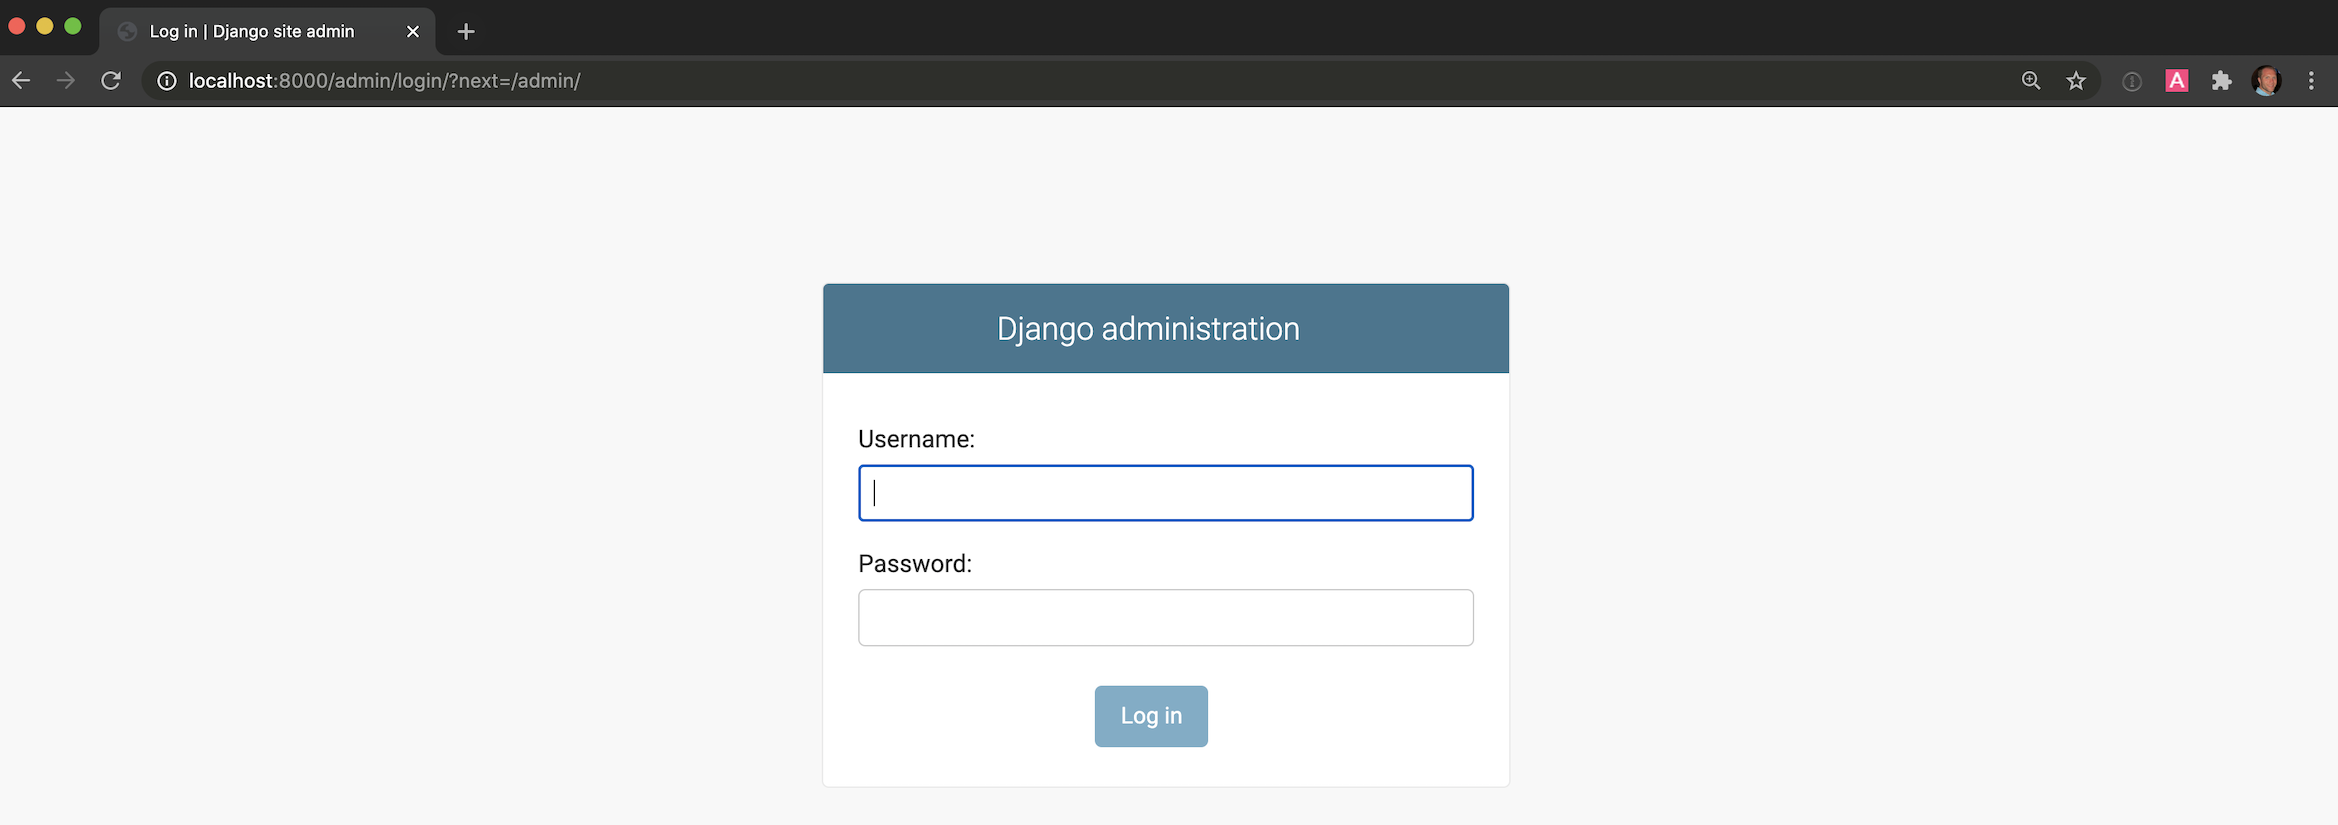
Enter the username and password of the superuser you just created with
the manage.py command to log in. Next, you will see the Django admin
dashboard.
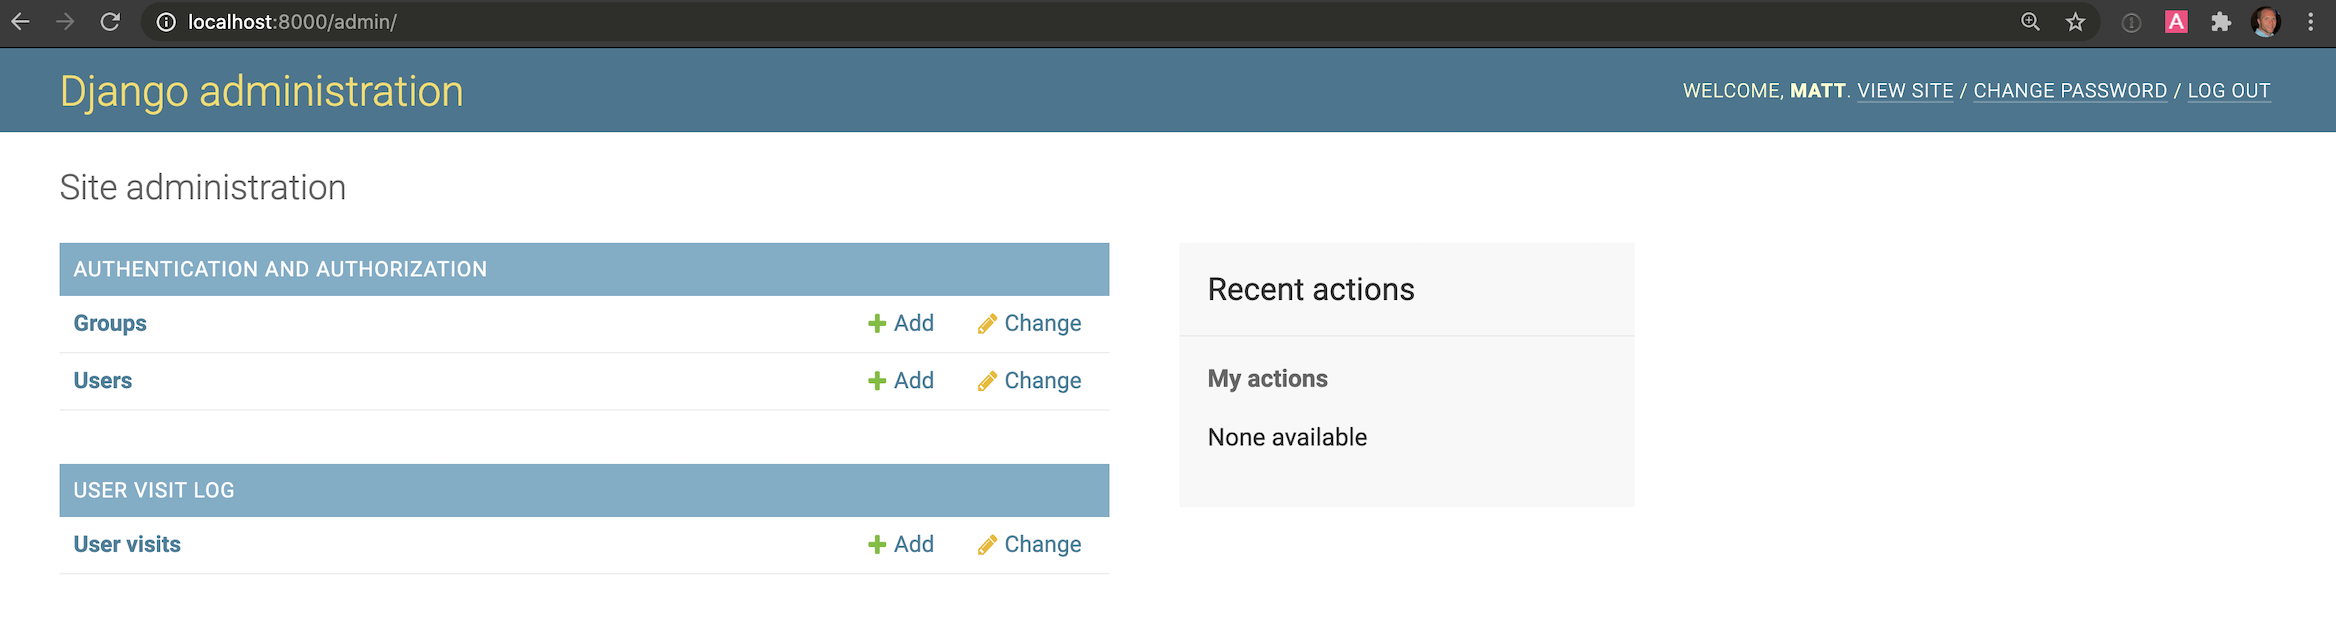
The "User visit log" has already been added to the Admin. Click on the "User visits" link.
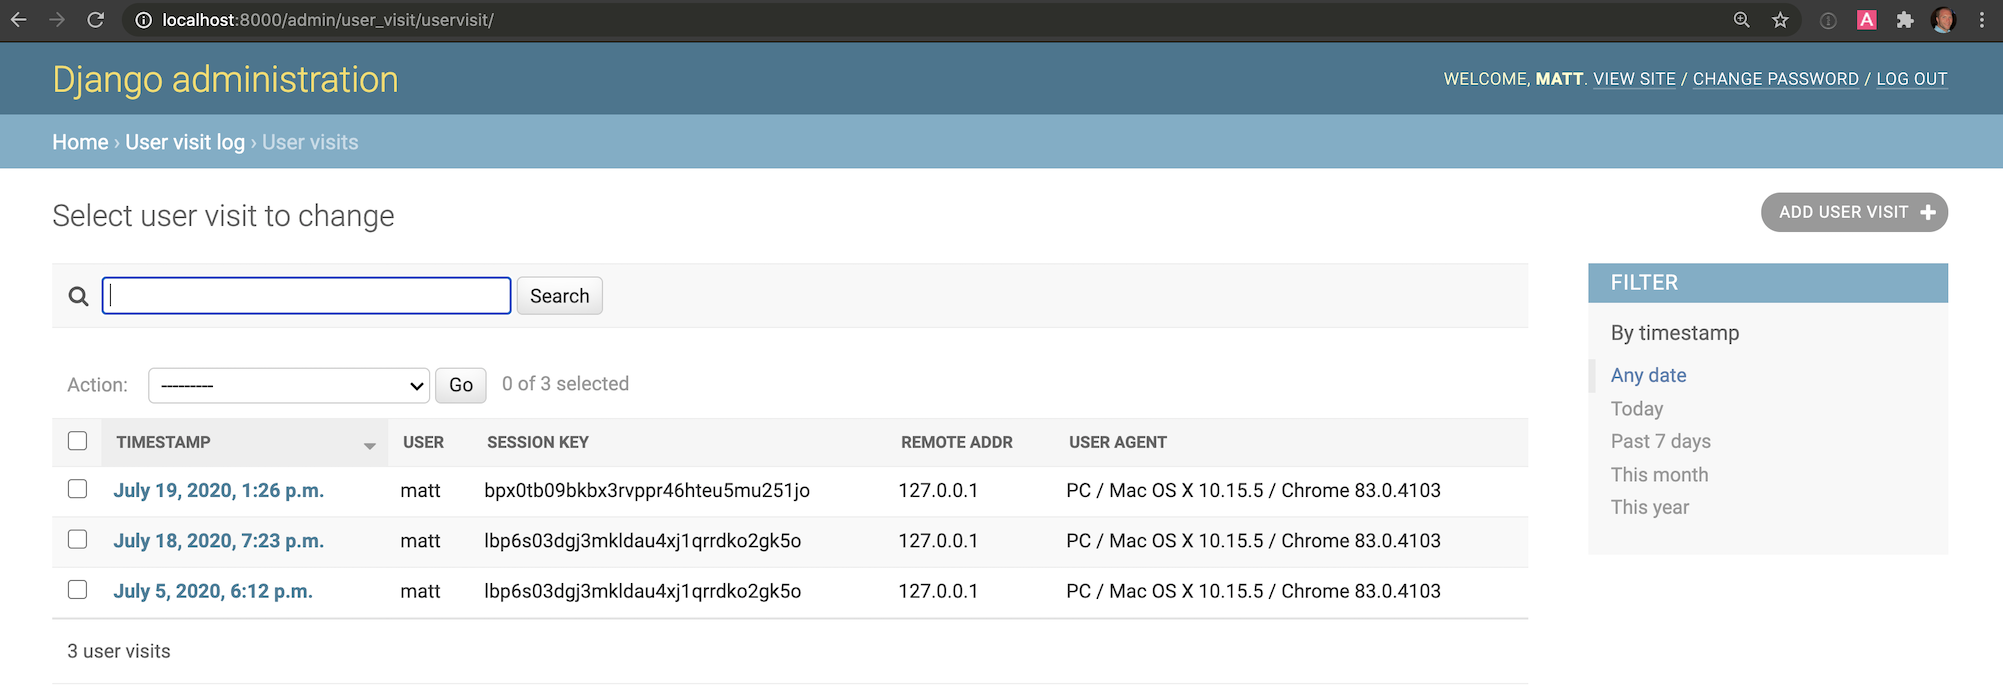
The list of all users that have visited by day will show up.
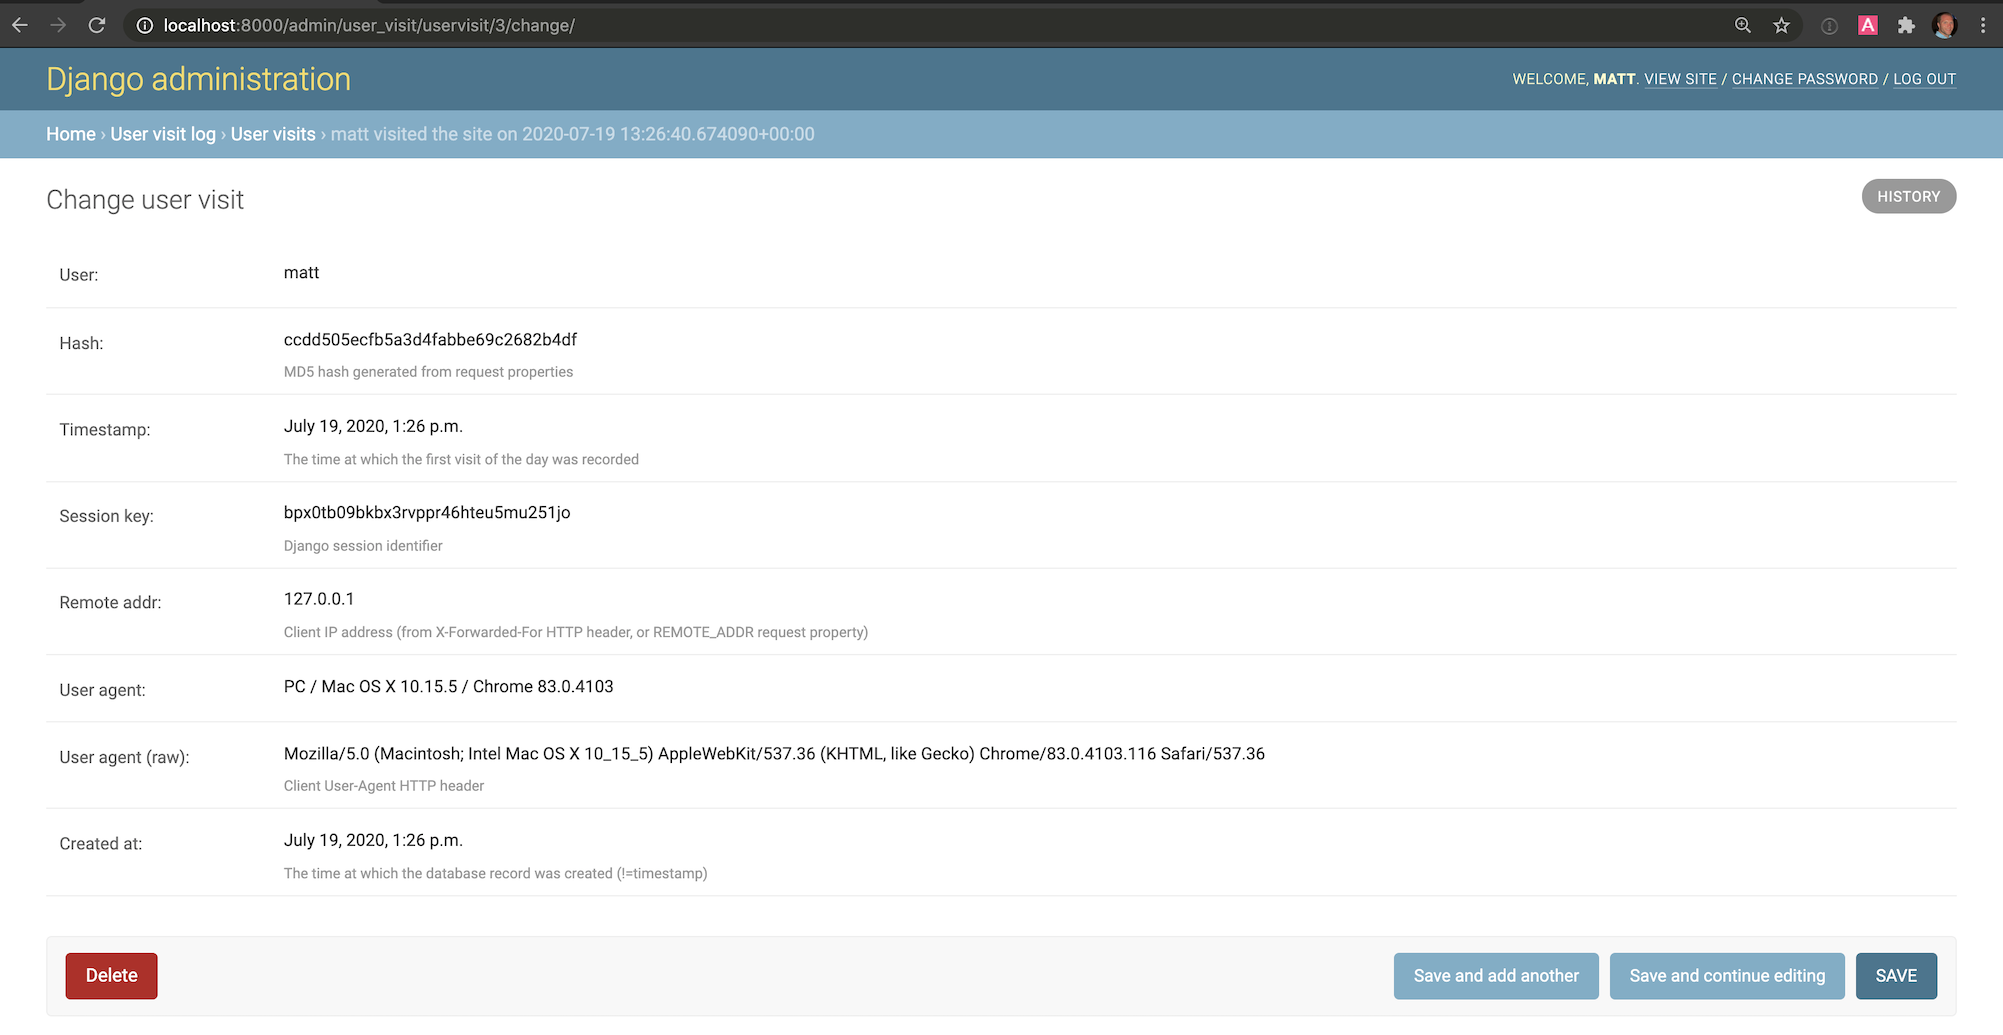
Click on any of the visits to see more detailed data about the record, just like you would with any Django Admin extension.
That library was pretty easy to install for the information that it aggregates for you. Next, let's take a closer look at the Django ORM model that powers this library.
Inspecting the django-user-visit model
We confirmed that django-user-visit is properly installed. Let's take a closer look at the model the library provides to store the user data.
Take a look at the source code for django-user-visit/user_visit/models.py on GitHub. Below is an excerpt with the relevant lines of that source file. I've highlighted a few lines that will be discussed below the code excerpt.
## ... source code abbreviated ...

class UserVisit(models.Model):
    """
    Record of a user visiting the site on a given day.
    This is used for tracking and reporting - knowing the volume of visitors
    to the site, and being able to report on someone's interaction with the site.
    We record minimal info required to identify user sessions, plus changes in
    IP and device. This is useful in identifying suspicious activity (multiple
    logins from different locations).
    Also helpful in identifying support issues (as getting useful browser data
    out of users can be very difficult over live chat).
    """

    user = models.ForeignKey(
        settings.AUTH_USER_MODEL, related_name="user_visits", on_delete=models.CASCADE
    )
    timestamp = models.DateTimeField(
        help_text="The time at which the first visit of the day was recorded",
        default=timezone.now,
    )
    session_key = models.CharField(help_text="Django session identifier", max_length=40)
    remote_addr = models.CharField(
        help_text=(
            "Client IP address (from X-Forwarded-For HTTP header, "
            "or REMOTE_ADDR request property)"
        ),
        max_length=100,
        blank=True,
    )
    ua_string = models.TextField(
        "User agent (raw)", help_text="Client User-Agent HTTP header", blank=True,
    )
    uuid = models.UUIDField(default=uuid.uuid4, editable=False, unique=True)
    hash = models.CharField(
        max_length=32,
        help_text="MD5 hash generated from request properties",
        unique=True,
    )
    created_at = models.DateTimeField(
        help_text="The time at which the database record was created (!=timestamp)",
        auto_now_add=True,
    )

    objects = UserVisitManager()

    class Meta:
        get_latest_by = "timestamp"

    def __str__(self) -> str:
        return f"{self.user} visited the site on {self.timestamp}"

    def __repr__(self) -> str:
        return f"<UserVisit id={self.id} user_id={self.user_id} date='{self.date}'>"

    def save(self, *args: Any, **kwargs: Any) -> None:
        """Set hash property and save object."""
        self.hash = self.md5().hexdigest()
        super().save(*args, **kwargs)

    @property
    def user_agent(self) -> user_agents.parsers.UserAgent:
        """Return UserAgent object from the raw user_agent string."""
        return user_agents.parsers.parse(self.ua_string)

    @property
    def date(self) -> datetime.date:
        """Extract the date of the visit from the timestamp."""
        return self.timestamp.date()

    # see https://github.com/python/typeshed/issues/2928 re. return type
    def md5(self) -> hashlib._Hash:
        """Generate MD5 hash used to identify duplicate visits."""
        h = hashlib.md5(str(self.user.id).encode())  # noqa: S303
        h.update(self.date.isoformat().encode())
        h.update(self.session_key.encode())
        h.update(self.remote_addr.encode())
        h.update(self.ua_string.encode())
        return h
A few things to note based on the highlighted above:
- The
UserVisitmodel matches up with the Django user model using theuser = models.ForeignKey...line - The code uses the
savefunction to ensure the some of the fields are automatically populated, such as thehashproperty using thehashlibmodule - This library has a dependency on the user_agents library to parse the User-Agent of the browser the client is using
Reading the source code for libraries like django-user-visit is helpful not only to know what it is doing under the covers, but also to learn new ways to code your own applications.
Take a look at the Django code examples and Django extensions pages to see more projects with good Python example code that you can learn from.
Additional resources
We just finished building an app that tracks daily user visits with the django-user-visit library.
Next, try out some of these other related Django tutorials:
- Quickly Use Bootstrap 4 in a Django Template with a CDN
- How to Add Maps to Django Web App Projects with Mapbox
- Monitoring Django Projects with Rollbar
Questions? Let me know via a GitHub issue ticket on the Full Stack Python repository, on Twitter @fullstackpython or @mattmakai. If you see an issue or error in this tutorial, please fork the source repository on GitHub and submit a pull request with the fix.