Quickly Use Bootstrap 4 in a Django Template with a CDN
The Django web framework makes it easy to render HTML using the Django template engine. However, the default styling on HTML pages usually need a Cascading Style Sheet (CSS) framework such as Bootstrap to make the design look decent. In this beginner's tutorial, we'll use the Bootstrap Content Delivery Network (CDN) to quickly add Bootstrap to a rendered HTML page.
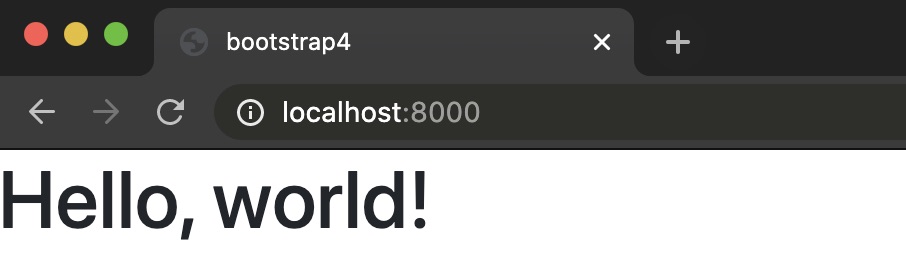
Here is what the <h1> element styling will look like at the end
of this tutorial:
Tutorial Requirements
Throughout this tutorial we are going to use the following dependencies, which we will install in just a moment. Make sure you also have Python 3, preferrably 3.7 or newer installed, in your environment:
We will use the following dependencies to complete this tutorial:
All code in this blog post is available open source under the MIT license on GitHub under the bootstrap-4-django-template directory of the blog-code-examples repository. Use the source code as you desire for your own projects.
Development environment set up
Change into the directory where you keep your Python virtual environments. Create a new virtualenv for this project using the following command.
Start the Django project by creating a new
virtual environment
using the following command. I recommend using a separate directory
such as ~/venvs/ (the tilde is a shortcut for your user's home
directory) so that you always know where all your virtualenvs are
located.
python3 -m venv ~/venvs/djbootstrap4
Activate the virtualenv with the activate shell script:
source ~/venvs/djbootstrap4/bin/activate
After the above command is executed, the command prompt will
change so that the name of the virtualenv is prepended to the
original command prompt format, so if your prompt is simply
$, it will now look like the following:
(djbootstrap4) $
Remember, you have to activate your virtualenv in every new terminal window where you want to use dependencies in the virtualenv.
We can now install the Django package into the activated but otherwise empty virtualenv.
pip install django==3.0.8
Look for output similar to the following to confirm the appropriate packages were installed correctly from PyPI.
Collecting django
  Using cached https://files.pythonhosted.org/packages/ca/ab/5e004afa025a6fb640c6e983d4983e6507421ff01be224da79ab7de7a21f/Django-3.0.8-py3-none-any.whl
Collecting sqlparse>=0.2.2 (from django)
  Using cached https://files.pythonhosted.org/packages/85/ee/6e821932f413a5c4b76be9c5936e313e4fc626b33f16e027866e1d60f588/sqlparse-0.3.1-py2.py3-none-any.whl
Collecting asgiref~=3.2 (from django)
  Using cached https://files.pythonhosted.org/packages/d5/eb/64725b25f991010307fd18a9e0c1f0e6dff2f03622fc4bcbcdb2244f60d6/asgiref-3.2.10-py3-none-any.whl
Collecting pytz (from django)
  Using cached https://files.pythonhosted.org/packages/4f/a4/879454d49688e2fad93e59d7d4efda580b783c745fd2ec2a3adf87b0808d/pytz-2020.1-py2.py3-none-any.whl
Installing collected packages: sqlparse, asgiref, pytz, django
Successfully installed asgiref-3.2.10 django-3.0.8 pytz-2020.1 sqlparse-0.3.1
We can get started coding the application now that we have all of our required dependencies installed.
Building our application
Let's begin coding our application.
We can use the Django django-admin tool to create
the boilerplate code structure to get our project started.
Change into the directory where you develop your applications. For
example, I typically use /Users/matt/devel/py/ for all of my
Python projects. Then run the following command to start a Django
project named djbootstrap4:
django-admin.py startproject djbootstrap4
Note that in this tutorial we are using the same name for both the virtualenv and the Django project directory, but they can be different names if you prefer that for organizing your own projects.
The django-admin command creates a directory named djbootstrap4
along with several subdirectories that you should be familiar with
if you have previously worked with Django.
Change directories into the new project.
cd djbootstrap4
Create a new Django app within djbootstrap4.
python manage.py startapp bootstrap4
Django will generate a new folder named bootstrap4 for the project.
We should update the URLs so the app is accessible before we write
our views.py code.
Open djbootstrap4/djbootstrap4/urls.py. Add the highlighted
lines so that URL resolver will check the bootstrap4 app
for additional routes to match with URLs that are requested of
this Django application.
# djbootstrap4/djbootstrap4/urls.py
from django.conf.urls import include
from django.contrib import admin
from django.urls import path


urlpatterns = [
    path('', include('bootstrap4.urls')),
    path('admin/', admin.site.urls),
]
Save djbootstrap4/djbootstrap4/urls.py and open
djbootstrap4/djbootstrap4/settings.py.
Add the bootstrap4 app to settings.py by inserting
the highlighted line:
# djbootstrap4/djbootstrap4/settings.py
# Application definition

INSTALLED_APPS = [
    'django.contrib.admin',
    'django.contrib.auth',
    'django.contrib.contenttypes',
    'django.contrib.sessions',
    'django.contrib.messages',
    'django.contrib.staticfiles',
    'bootstrap4',
]
Make sure you change the default DEBUG and SECRET_KEY
values in settings.py before you deploy any code to production. Secure
your app properly with the information from the Django
production deployment checklist
so that you do not add your project to the list of hacked applications
on the web.
Save and close settings.py.
Next change into the djbootstrap4/bootstrap4 directory. Create
a new file named urls.py to contain routes for the bootstrap4 app.
Add all of these lines to the empty djbootstrap4/bootstrap4/urls.py
file.
# djbootstrap4/bootstrap4/urls.py
from django.conf.urls import url
from . import views

urlpatterns = [
    url(r'', views.bootstrap4_index, name="index"),
]
Save djbootstrap4/bootstrap4/urls.py. Open
djbootstrap4/bootstrap4/views.py to add the
following two highlighted lines. You can keep the boilerplate comment
"# Create your views here." or delete like I usually do.
# djbootstrap4/bootstrap4/views.py
from django.shortcuts import render


def bootstrap4_index(request):
    return render(request, 'index.html', {})
Next, create a directory for your template files named templates under
the djmaps/maps app directory.
mkdir templates
Create a new file named index.html within
djbootstrap4/bootstrap4/templates that contains the
following Django template language markup.
<!DOCTYPE html>
<html>
  <head>
    <title>First step for bootstrap4</title>
  </head>
  <body>
   <h1>Hello, world!</h1>
  </body>
</html>
We can test out this static page to make sure all of our code is
correct before we start adding the meat of the functionality to
the project. Change into the base directory of your Django project
where the manage.py file is located. Execute the development
server with the following command:
python manage.py runserver
The Django development server should start up with no issues other than an unapplied migrations warning.
Watching for file changes with StatReloader
Performing system checks...

System check identified no issues (0 silenced).

You have 17 unapplied migration(s). Your project may not work properly until you apply the migrations for app(s): admin, auth, contenttypes, sessions.
Run 'python manage.py migrate' to apply them.

July 05, 2020 - 10:59:58
Django version 3.0.8, using settings 'djbootstrap4.settings'
Starting development server at http://127.0.0.1:8000/
Quit the server with CONTROL-C.
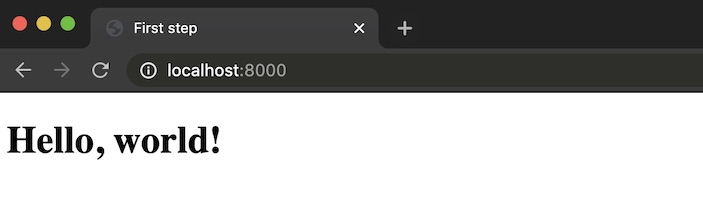
Open a web browser and go to "http://localhost:8000".
With our base application working, we can now add Bootstrap.
Integrating Bootstrap
Time to add Bootstrap into the template so we can use its styling.
Open djbootstrap4/bootstrap4/templates/index.html back up and
add or modify the following highlighted lines, which are very
similar to what you will find in the
Bootstrap introduction guide:
<!DOCTYPE html>
<html lang="en">
  <head>
    <meta charset="utf-8">
    <meta name="viewport" content="width=device-width, initial-scale=1, shrink-to-fit=no">
    <link rel="stylesheet" href="https://stackpath.bootstrapcdn.com/bootstrap/4.5.0/css/bootstrap.min.css" integrity="sha384-9aIt2nRpC12Uk9gS9baDl411NQApFmC26EwAOH8WgZl5MYYxFfc+NcPb1dKGj7Sk" crossorigin="anonymous">
    <title>bootstrap4</title>
  </head>
  <body>
    <h1>Hello, world!</h1>

    <!-- Optional JavaScript -->
    <!-- jQuery first, then Popper.js, then Bootstrap JS -->
    <script src="https://code.jquery.com/jquery-3.5.1.slim.min.js" integrity="sha384-DfXdz2htPH0lsSSs5nCTpuj/zy4C+OGpamoFVy38MVBnE+IbbVYUew+OrCXaRkfj" crossorigin="anonymous"></script>
    <script src="https://cdn.jsdelivr.net/npm/[email protected]/dist/umd/popper.min.js" integrity="sha384-Q6E9RHvbIyZFJoft+2mJbHaEWldlvI9IOYy5n3zV9zzTtmI3UksdQRVvoxMfooAo" crossorigin="anonymous"></script>
    <script src="https://stackpath.bootstrapcdn.com/bootstrap/4.5.0/js/bootstrap.min.js" integrity="sha384-OgVRvuATP1z7JjHLkuOU7Xw704+h835Lr+6QL9UvYjZE3Ipu6Tp75j7Bh/kR0JKI" crossorigin="anonymous"></script>
  </body>
</html>
The above new lines in the <head> section add a couple of meta elements
that are important to Bootstrap's styling, and add the mandatory Bootstrap
stylesheet.
We keep the same <h1> header, which will automatically get the CSS
styling. Then there are 3 optional script elements that pull in
Bootstrap JavaScript for more advanced features.
We are not using them in this tutorial because we just wanted to
quickly show how to use the CDN and with this in place you can see
in the
Bootstrap content docs
what you want to add to the template next.
Refresh the page at "http://localhost:8000" and you should see "Hello, world!" change fonts.
If you see that, it means everything works as expected.
What now?
We just added Bootstrap via the CDN so we can use it in our Django template. This was the absolute simplest way to add Bootstrap to a single Django page and now there's a ton more you can do with it.
Next, try out some of these other related Django tutorials:
- More Bootstrap resources
- How to Add Maps to Django Web App Projects with Mapbox
- Monitoring Django Projects with Rollbar
Questions? Contact me via Twitter @fullstackpython or @mattmakai. I am also on GitHub with the username mattmakai. If you see an issue or error in this tutorial, please fork the source repository on GitHub and submit a pull request with the fix.