Adding Okta Authentication to an Existing Flask Web App
It can be a lot of work to piece together a full authentication system if you have an existing Flask web application that you are coding. Okta makes it much easier to drop-in a complete user authentication system without a lot of additional effort. In this tutorial we will take the Flask Git Dashboard project as an example and add Okta to it.
Libraries
Python 3 is required for this tutorial and we will also use:
- Flask web framework version 1.0.2
- Flask-OIDC where OIDC stands for "OpenID Connect". It provides support to use OpenID Connect in Flask applications.
- Okta Python helper library
- A free Okta developer account
All of the finished code in this blog post is provided as open source under the MIT license on GitHub under the auth-existing-flask-app/finished directory of the blog-code-examples repository. Use and abuse the source code for your own applications.
Installing Dependencies
We will start out with an existing Flask web application. If you do not have your own that you are modifying, clone this Git repository:
git clone [email protected]:fullstackpython/blog-code-examples.git
Next, create a new Python virtualenv for this project:
python3 -m venv flaskauth
Activate the virtual environment with the activate script:
. ./flaskauth/bin/activate
The command prompt should change after activation:

Remember that you will have to activate the virtualenv in every terminal window where you want to use the dependencies contained in this virtualenv.
Change into the project directory within the block-code-examples Git
repository that you cloned.
cd blog-code-examples/auth-existing-flask-app/start/
Now we can install the dependencies for the existing project.
pip install -r requirements.txt
Look for output similar to the following to confirm that the dependencies successfully installed:
...
Collecting amqp<3.0,>=2.1.4 (from kombu<5.0,>=4.0.2->Celery==4.1.0->-r requirements.txt (line 4))
  Downloading https://files.pythonhosted.org/packages/7f/cf/12d4611fc67babd4ae250c9e8249c5650ae1933395488e9e7e3562b4ff24/amqp-2.3.2-py2.py3-none-any.whl (48kB)
    100% |████████████████████████████████| 51kB 10.7MB/s
Collecting six>=1.5 (from python-dateutil->alembic>=0.6->Flask-Migrate==2.2.0->-r requirements.txt (line 2))
  Using cached https://files.pythonhosted.org/packages/67/4b/141a581104b1f6397bfa78ac9d43d8ad29a7ca43ea90a2d863fe3056e86a/six-1.11.0-py2.py3-none-any.whl
Collecting vine>=1.1.3 (from amqp<3.0,>=2.1.4->kombu<5.0,>=4.0.2->Celery==4.1.0->-r requirements.txt (line 4))
  Downloading https://files.pythonhosted.org/packages/10/50/5b1ebe42843c19f35edb15022ecae339fbec6db5b241a7a13c924dabf2a3/vine-1.1.4-py2.py3-none-any.whl
Installing collected packages: click, itsdangerous, Werkzeug, MarkupSafe, Jinja2, Flask, SQLAlchemy, Flask-SQLAlchemy, Mako, python-editor, six, python-dateutil, alembic, Flask-Migrate, billiard, pytz, vine, amqp, kombu, Celery, redis, WTForms
  Running setup.py install for MarkupSafe ... done
  Running setup.py install for SQLAlchemy ... done
  Running setup.py install for Mako ... done
  Running setup.py install for python-editor ... done
  Running setup.py install for alembic ... done
  Running setup.py install for billiard ... done
  Running setup.py install for WTForms ... done
Successfully installed Celery-4.1.0 Flask-1.0.2 Flask-Migrate-2.2.0 Flask-SQLAlchemy-2.3.2 Jinja2-2.10 Mako-1.0.7 MarkupSafe-1.0 SQLAlchemy-1.2.12 WTForms-2.1 Werkzeug-0.14.1 alembic-1.0.1 amqp-2.3.2 billiard-3.5.0.4 click-7.0 itsdangerous-1.1.0 kombu-4.2.1 python-dateutil-2.7.5 python-editor-1.0.3 pytz-2018.7 redis-2.10.6 six-1.11.0 vine-1.1.4
We need a couple of additional dependencies for our project to
work, flask-oidc and okta:
pip install flask-oidc>=1.4.0 okta==0.0.4
The dependencies are now properly installed into our virtual environment. Let's test out the application to see if we can get it running properly.
export FLASK_APP=flaskdash.py
export FLASK_ENV=development
flask run
We should see the application start up with some default development time values:
 * Serving Flask app "flaskdash.py" (lazy loading)
 * Environment: development
 * Debug mode: on
 * Running on http://127.0.0.1:5000/ (Press CTRL+C to quit)
 * Restarting with stat
 * Debugger is active!
 * Debugger PIN: 203-814-092
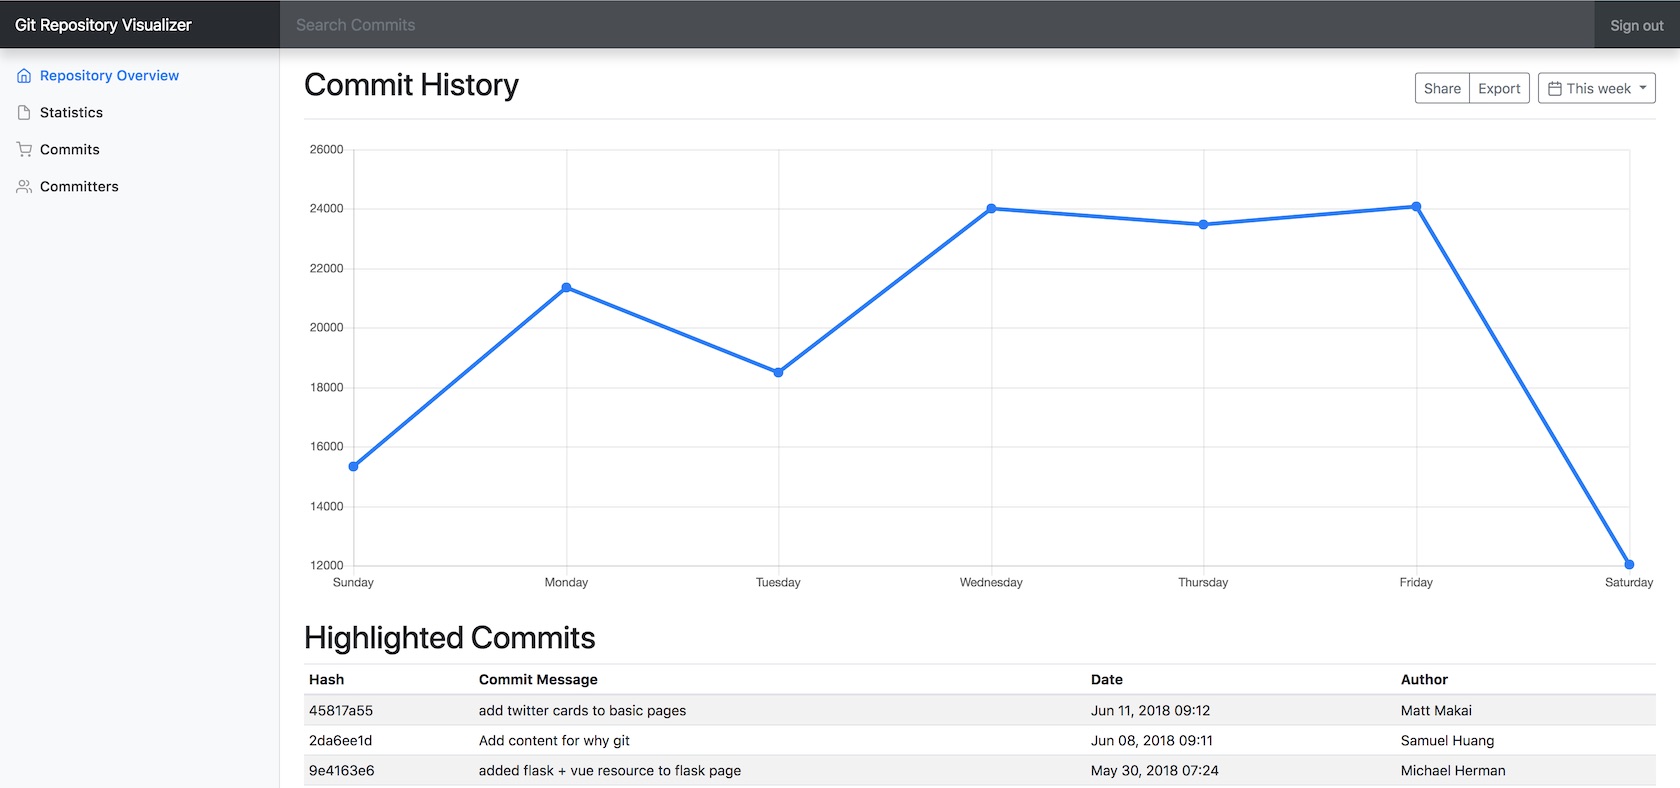
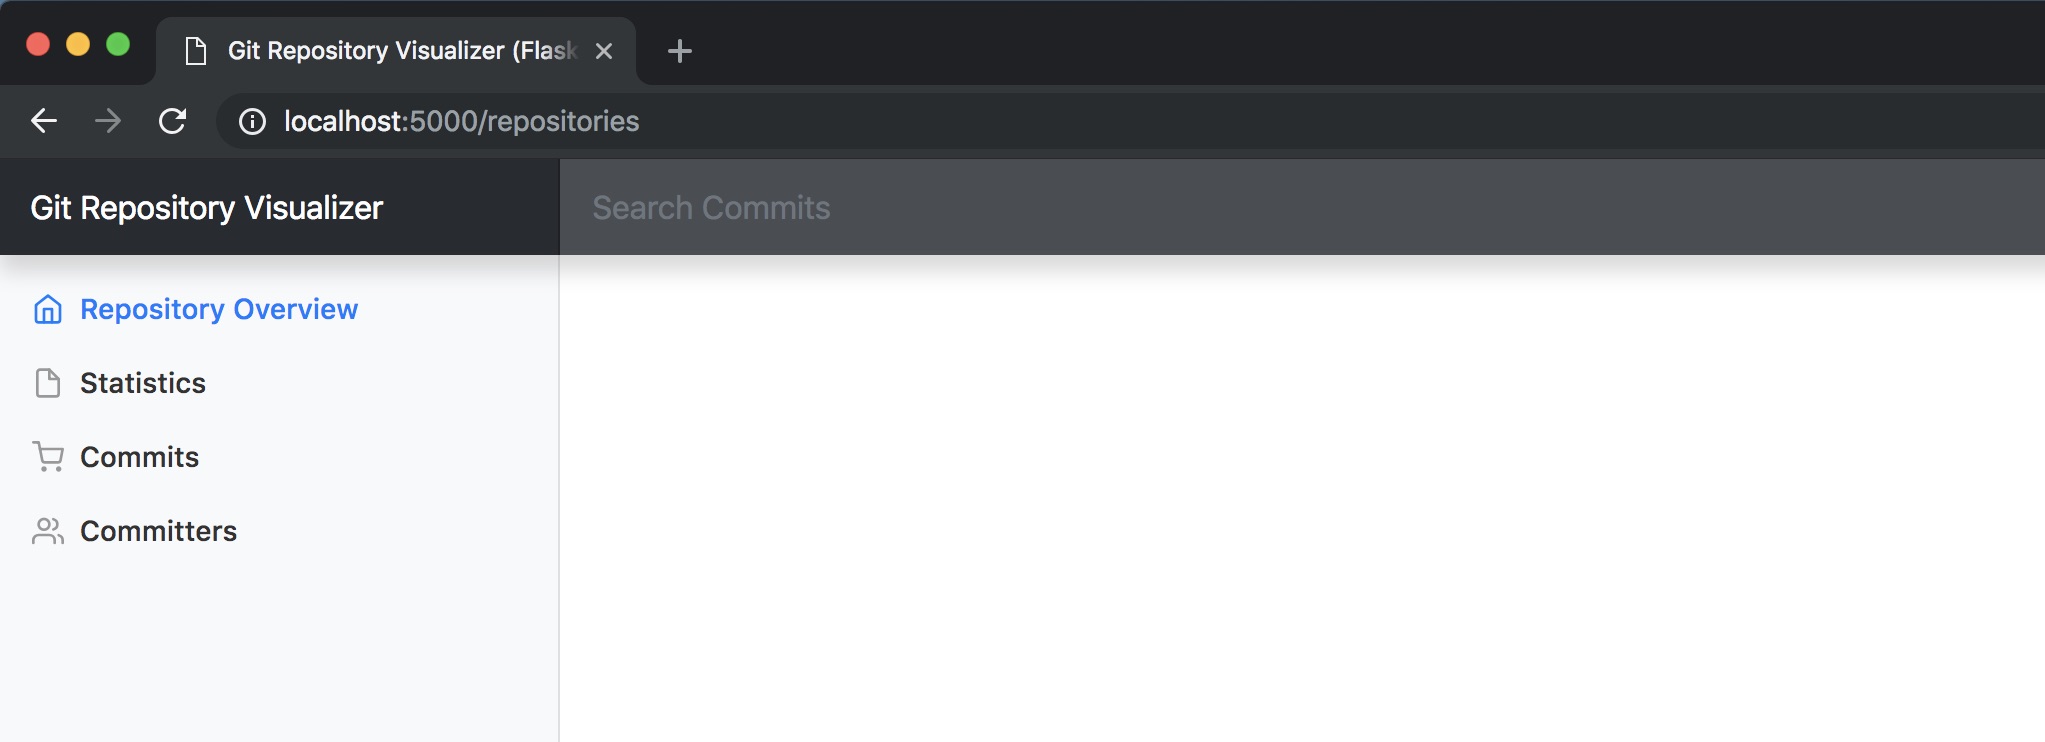
Head to localhost:5000 in your web browser and we should see a work-in-progress dashboard:
It's time to get to setting up an Okta developer account so we can get the appropriate configuration information for our application.
Okta for Authentication
Head to the Okta developers sign up page.
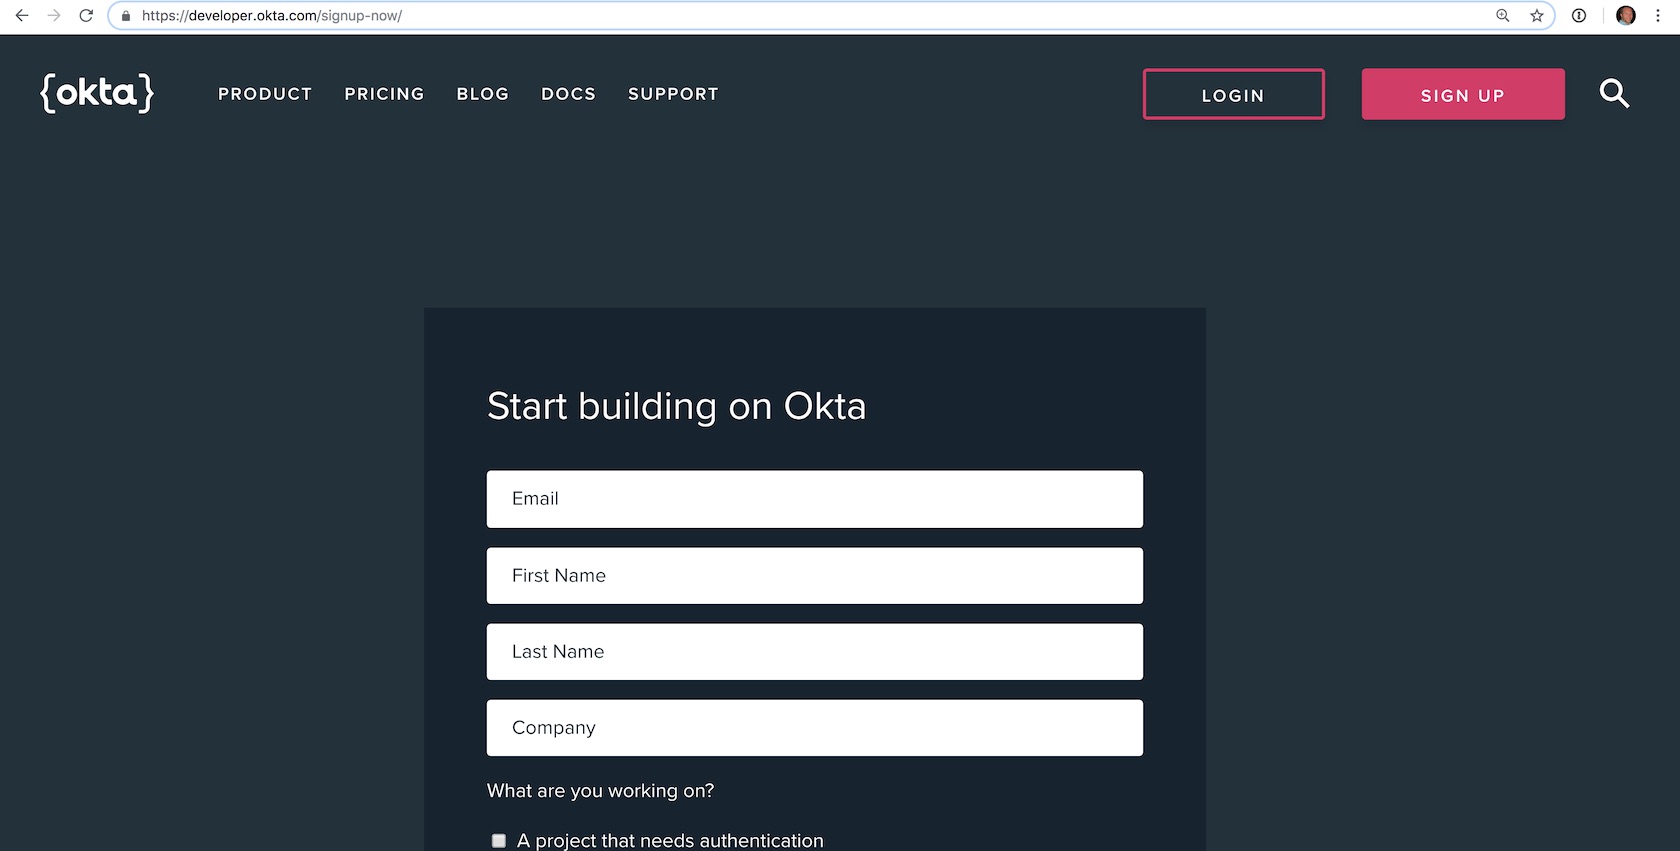
Sign up for a new account or log into your existing account.
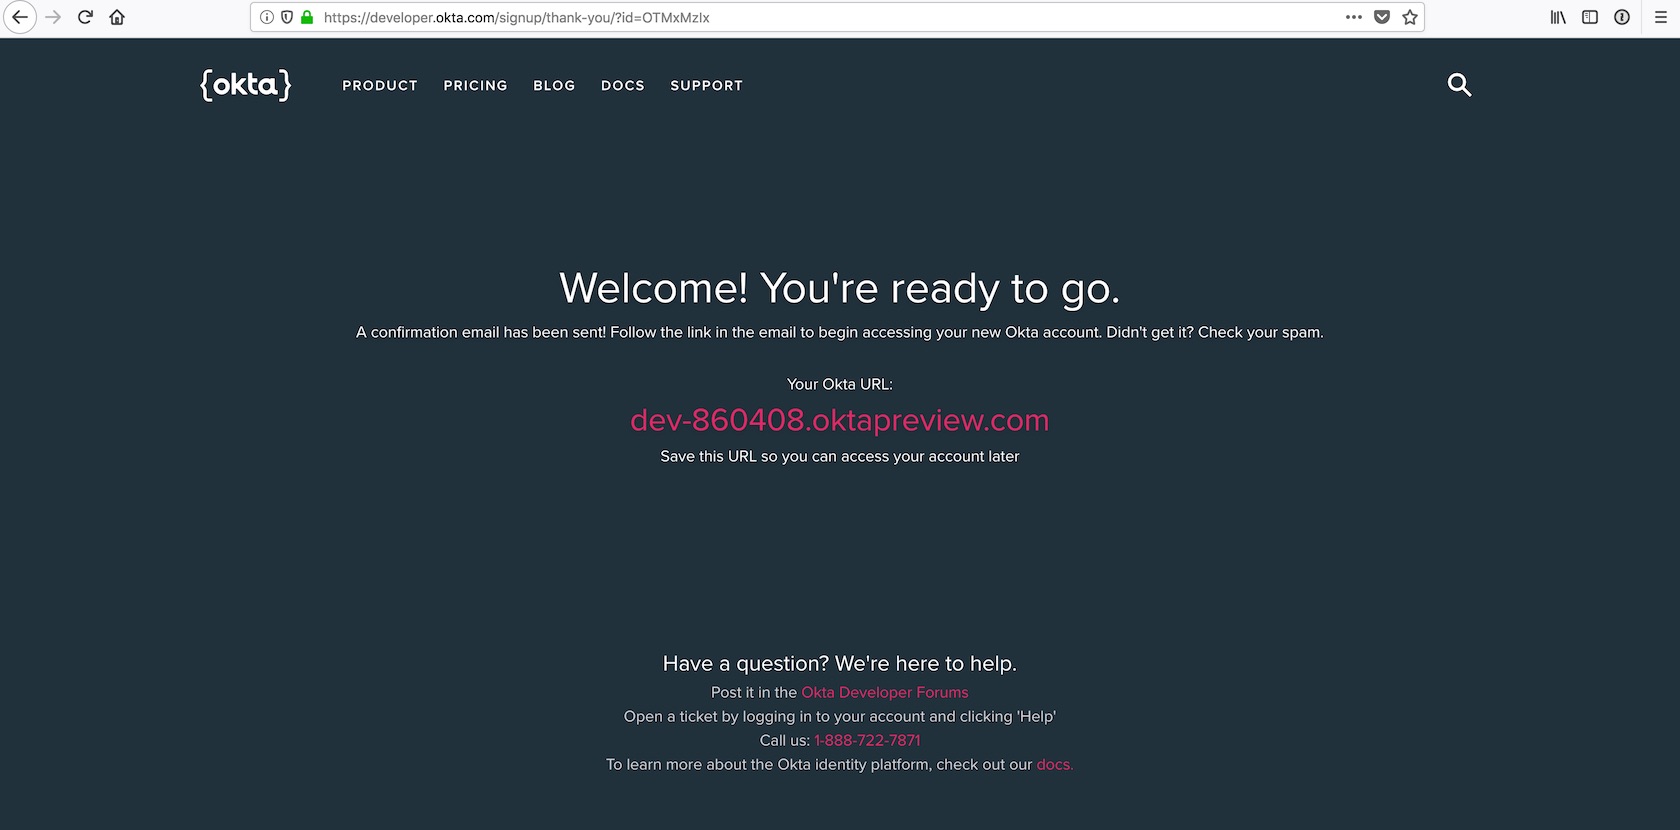
The interesting bit about the Okta developer sign up flow is that now you should check your email to finish creating your account. Look for an email like this one:
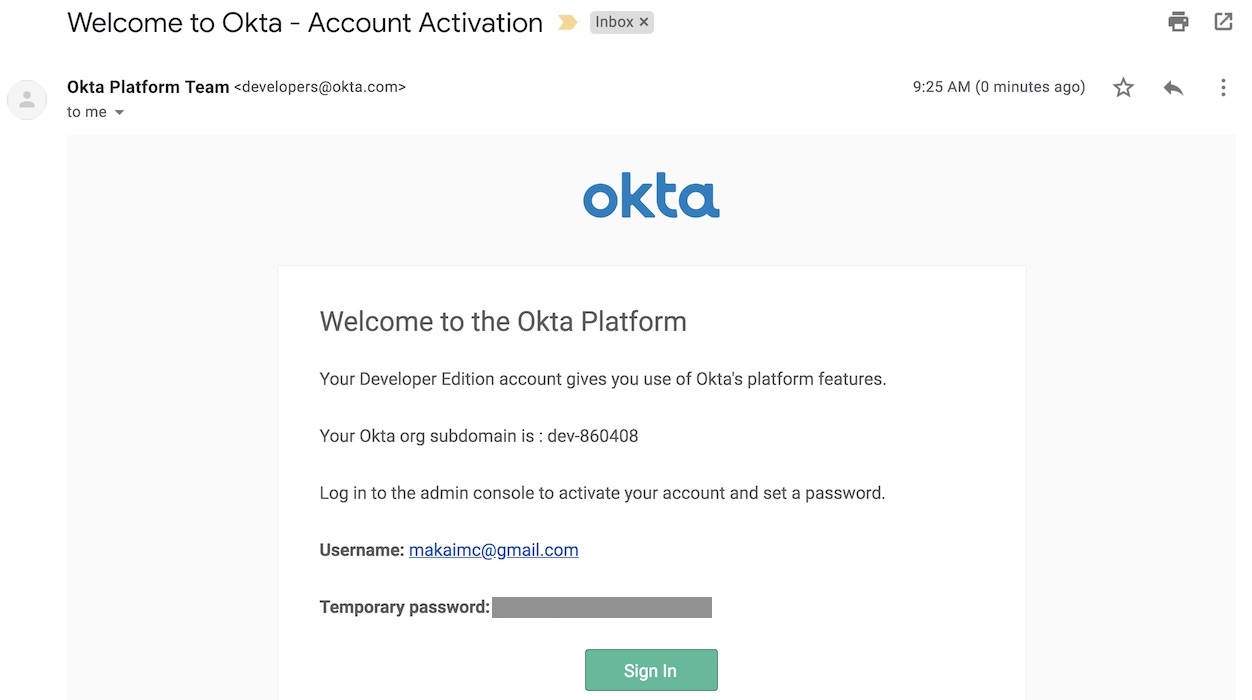
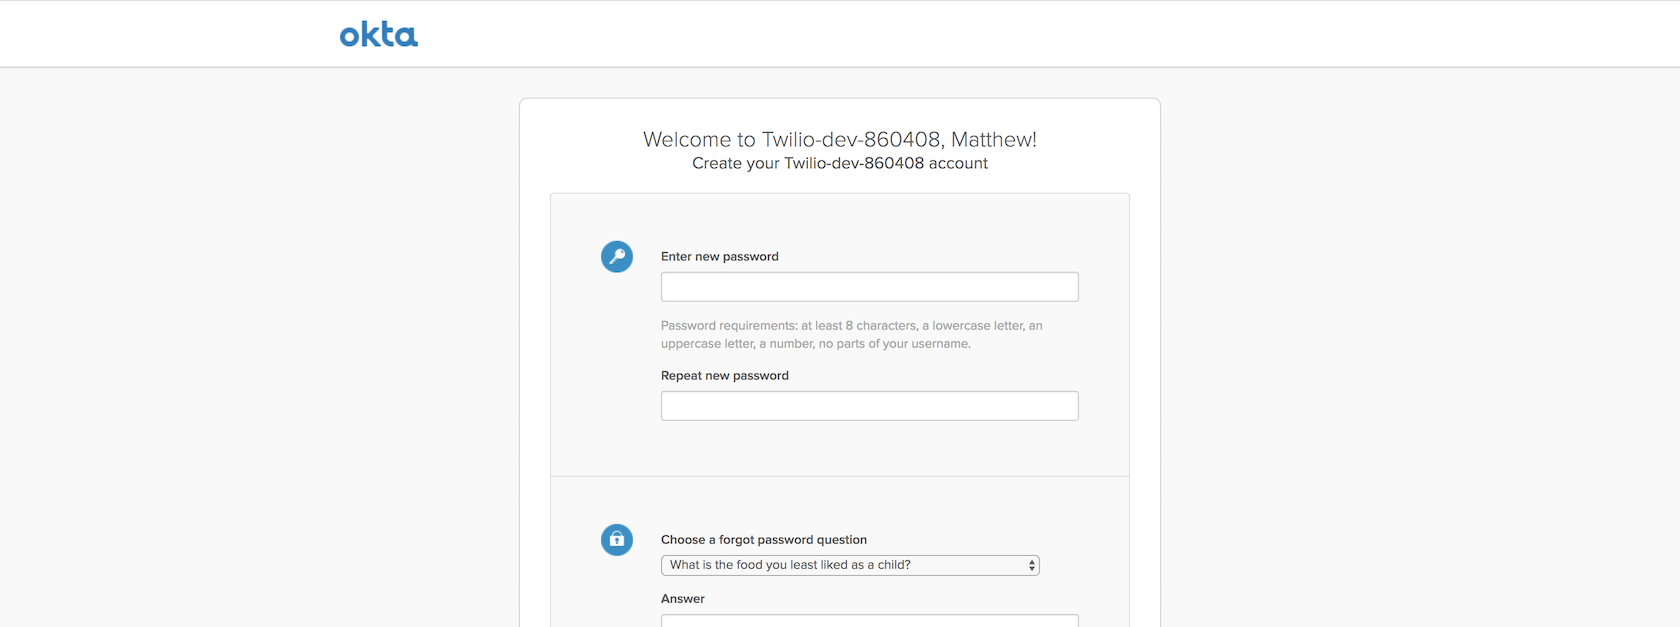
Click the "Sign In" button and log into developer account using the temporary password found in the email. Set a new password and challenge question. Then pick an image to match your account login process.
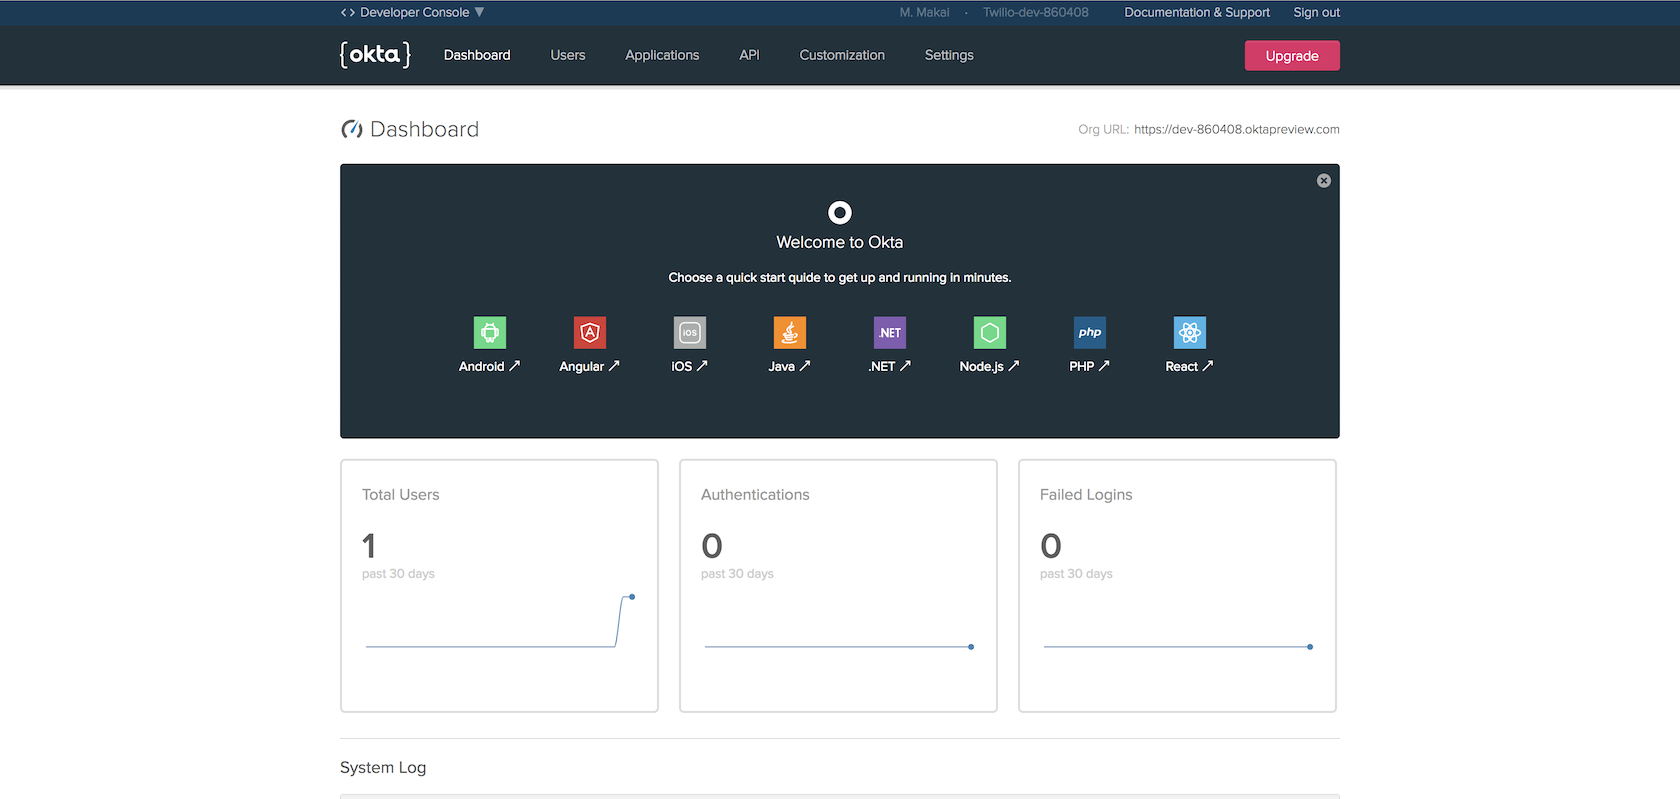
Click the "Create Account" button and you will be wisked away to the Okta developer dashboard.
Find the "Org URL" as shown in the following image.
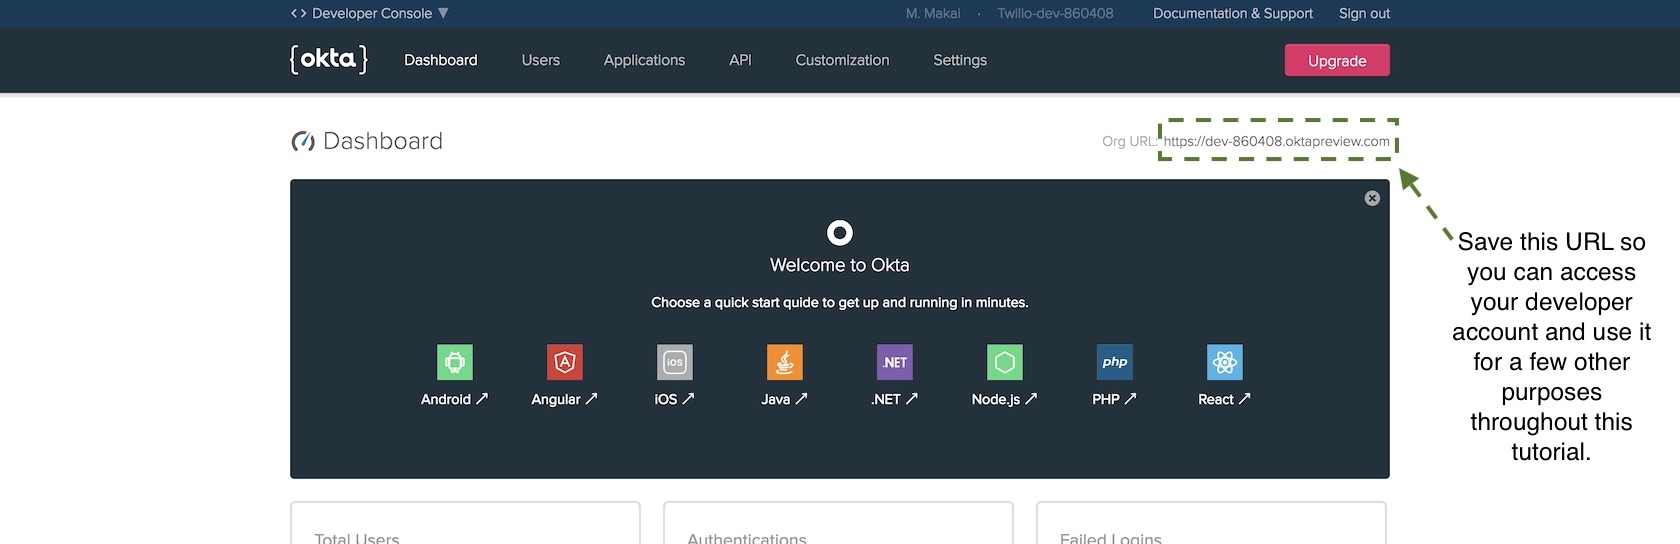
We are going to use that URL in our secret credentials file so that our Flask web app can properly connect to the Okta service.
Create a new file in your project directory named
openidconnect_secrets.json with the following contents:
{
  "web": {
    "client_id": "{{ OKTA_CLIENT_ID }}",
    "client_secret": "{{ OKTA_CLIENT_SECRET }}",
    "auth_uri": "{{ OKTA_ORG_URL }}/oauth2/default/v1/authorize",
    "token_uri": "{{ OKTA_ORG_URL }}/oauth2/default/v1/token",
    "issuer": "{{ OKTA_ORG_URL }}/oauth2/default",
    "userinfo_uri": "{{ OKTA_ORG_URL }}/oauth2/default/userinfo",
    "redirect_uris": [
      "http://localhost:5000/oidc/callback"
    ]
  }
}
Replace the four {{ OKTA_ORG_URL }} placeholders with the Org URL value
found in your dashboard. We will fill in the rest of the placeholders with
actual values as we proceed through the tutorial. My
openidconnect_secret.json file would currently have the following
values based on my developer dashboard Org URL.
Remember that your URL values will be different!
{
  "web": {
    "client_id": "{{ OKTA_CLIENT_ID }}",
    "client_secret": "{{ OKTA_CLIENT_SECRET }}",
    "auth_uri": "https://dev-860408.oktapreview.com/oauth2/default/v1/authorize",
    "token_uri": "https://dev-860408.oktapreview.com/oauth2/default/v1/token",
    "issuer": "https://dev-860408.oktapreview.com/oauth2/default",
    "userinfo_uri": "https://dev-860408.oktapreview.com/oauth2/default/userinfo",
    "redirect_uris": [
      "http://localhost:5000/oidc/callback"
    ]
  }
}
Okay awesome, we have our Okta account set up so we can add the authentication code to our Flask application.
Updating the Flask App with Okta
We need to connect our Flask code to our new Okta account. The recommended way of including variables such as account credentials in a Flask application is through configuration handling.
Update config.py the Flask code with the following highlighted lines.
import os


class Config(object):
    SECRET_KEY = os.getenv('SECRET_KEY') or 'development key'

    # Redis
    REDIS_SERVER = os.getenv('REDIS_SERVER') or 'localhost'
    REDIS_PORT = os.getenv('REDIS_PORT') or 6379
    REDIS_DB = os.getenv('REDIS_DB') or 1
    REDIS_URL = 'redis://{}:{}'.format(REDIS_SERVER, REDIS_PORT)

    # Celery task queue
    CELERY_BROKER_URL = os.getenv('CELERY_BROKER_URL') or REDIS_URL
    CELERY_RESULT_BACKEND = os.getenv('CELERY_RESULT_BACKEND') or REDIS_URL

    # database settings
    SQLALCHEMY_DATABASE_URI = os.getenv('DATABASE_URL') or \
      'sqlite:///' + os.path.join(os.path.abspath(os.path.dirname(__file__)),
      'flaskdash.db')
    SQLALCHEMY_TRACK_MODIFICATIONS = False

    OIDC_CLIENT_SECRETS = "openidconnect_secrets.json"
    OIDC_COOKIE_SECURE = False
    OIDC_CALLBACK_ROUTE = "/oidc/callback"
    OIDC_SCOPES = ["openid", "email", "profile"]
    OIDC_ID_TOKEN_COOKIE_NAME = "oidc_token"
We first add three import lines, one to pull values from environment variables, and the next two imports to make it possible to use OpenID Connect and Okta in our application.
The rest of the new code sets Flask application configuration values that can be used to instantiate the OpenID Connect and Okta clients.
OIDC_CLIENT_SECRETS: the location of the OpenID Connect secrets fileOIDC_COOKIE_SECURE: allows development mode for testing user login and registration without SSL. Your application must set this toTruein a production application.OIDC_CALLBACK_ROUTE: URL in the web app for handling user loginsOIDC_SCOPES: what data to request about the user when they log in. Our application requests the basic email, name and profile informationSECRET_KEY: this is a Flask setting to keep sessions secure. The key must never be made public or your web application user sessions will be compromised.
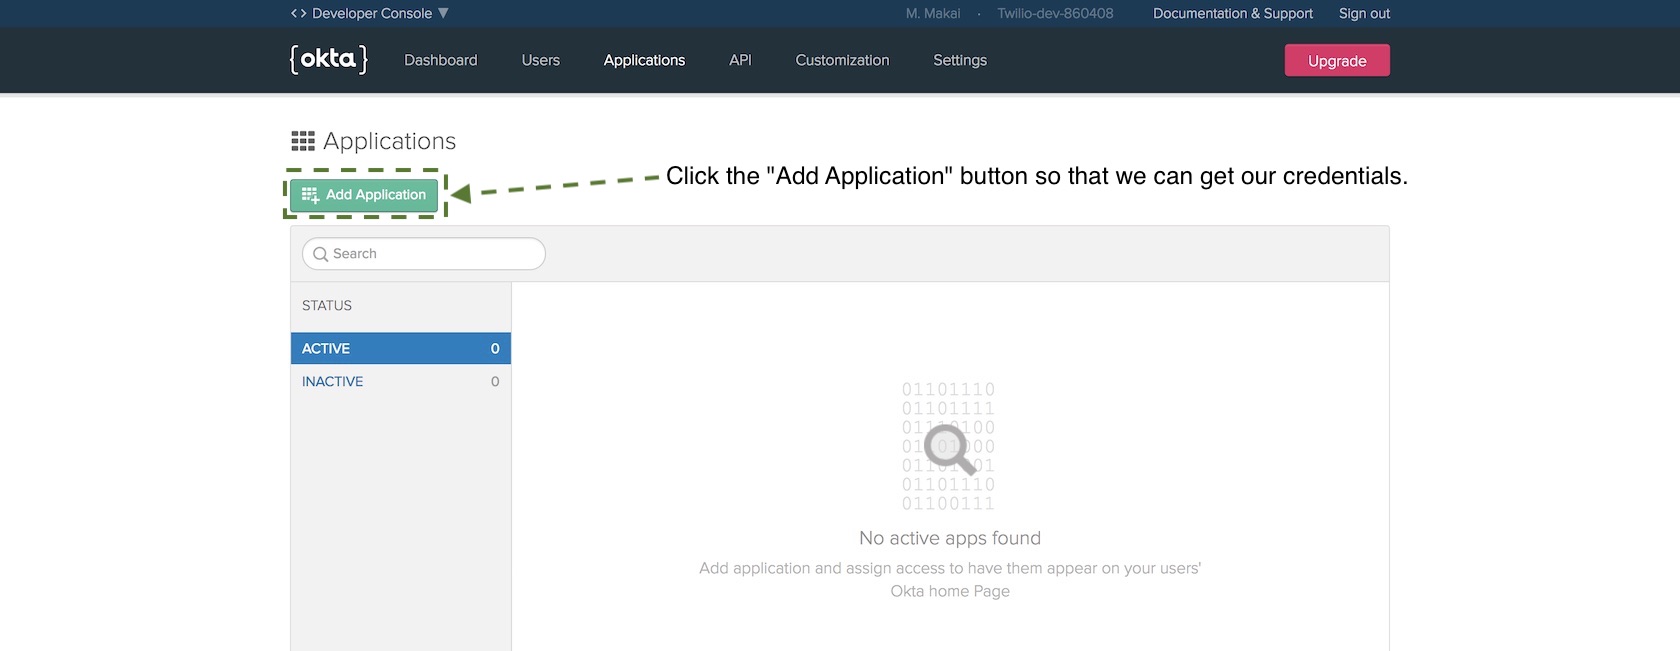
Where do we get those application configuration values though? We need to obtain them from our Okta account so go back to the dashboard to create a new OpenID Connect application.

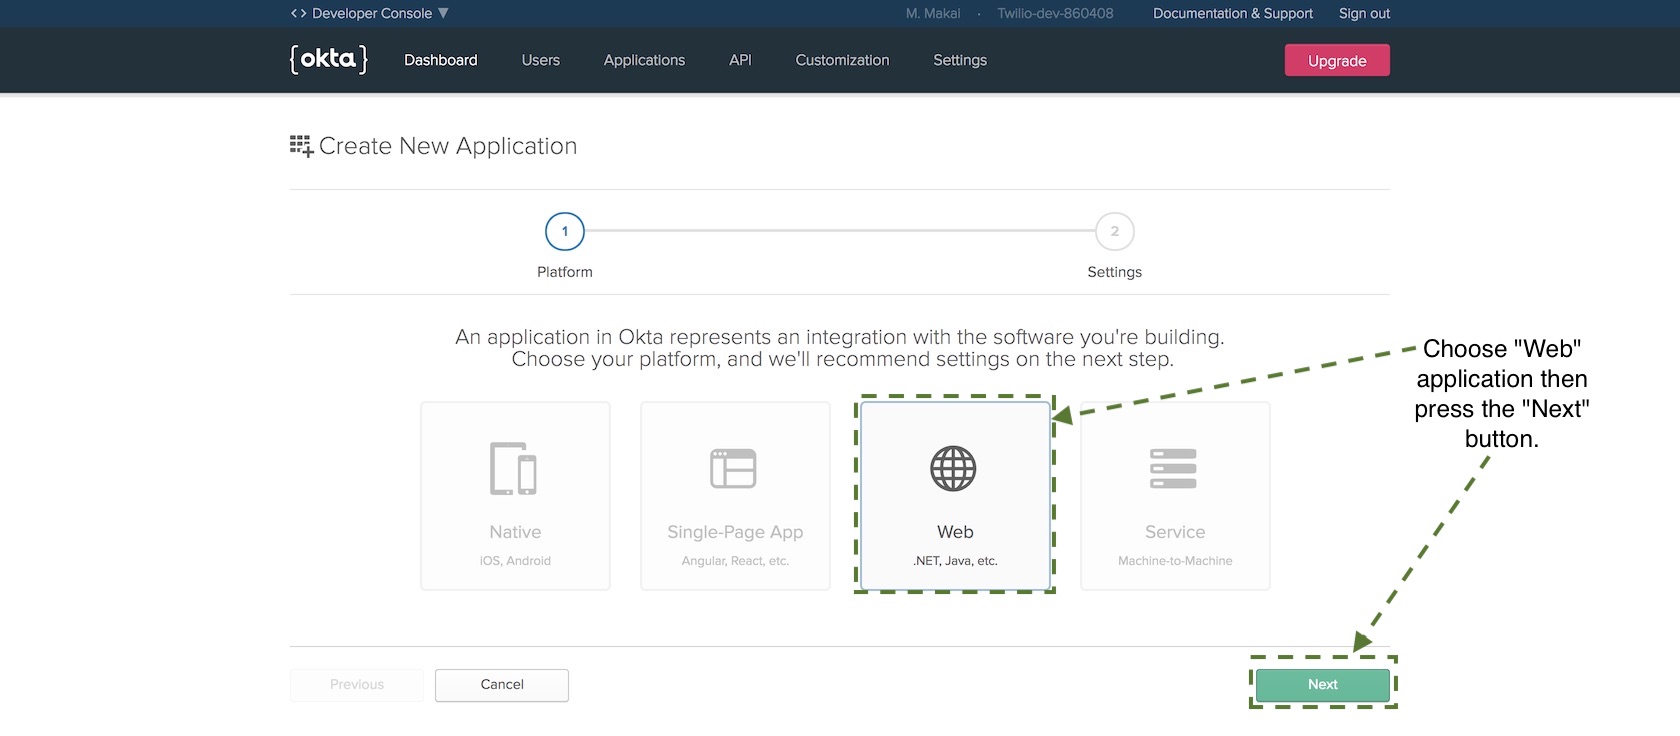
OpenID Connect applications use a client ID and client secret in place of traditional usernames and passwords. The client ID and client secret will tell your authorization server to recognize your application. Press the "Add Application" button.
On the new application screen choose "Web" and then press "Next".
On the next page there are numerous configuration options but only a
few values we need to fill in before we can get our credentials. Set
the following values to the Name, Base URIs and Login redirect URIs
properties:
- FlaskApp for
Name - http://localhost:5000 for
Base URIs - http://localhost:5000/oidc/callback for
Login redirect URIs
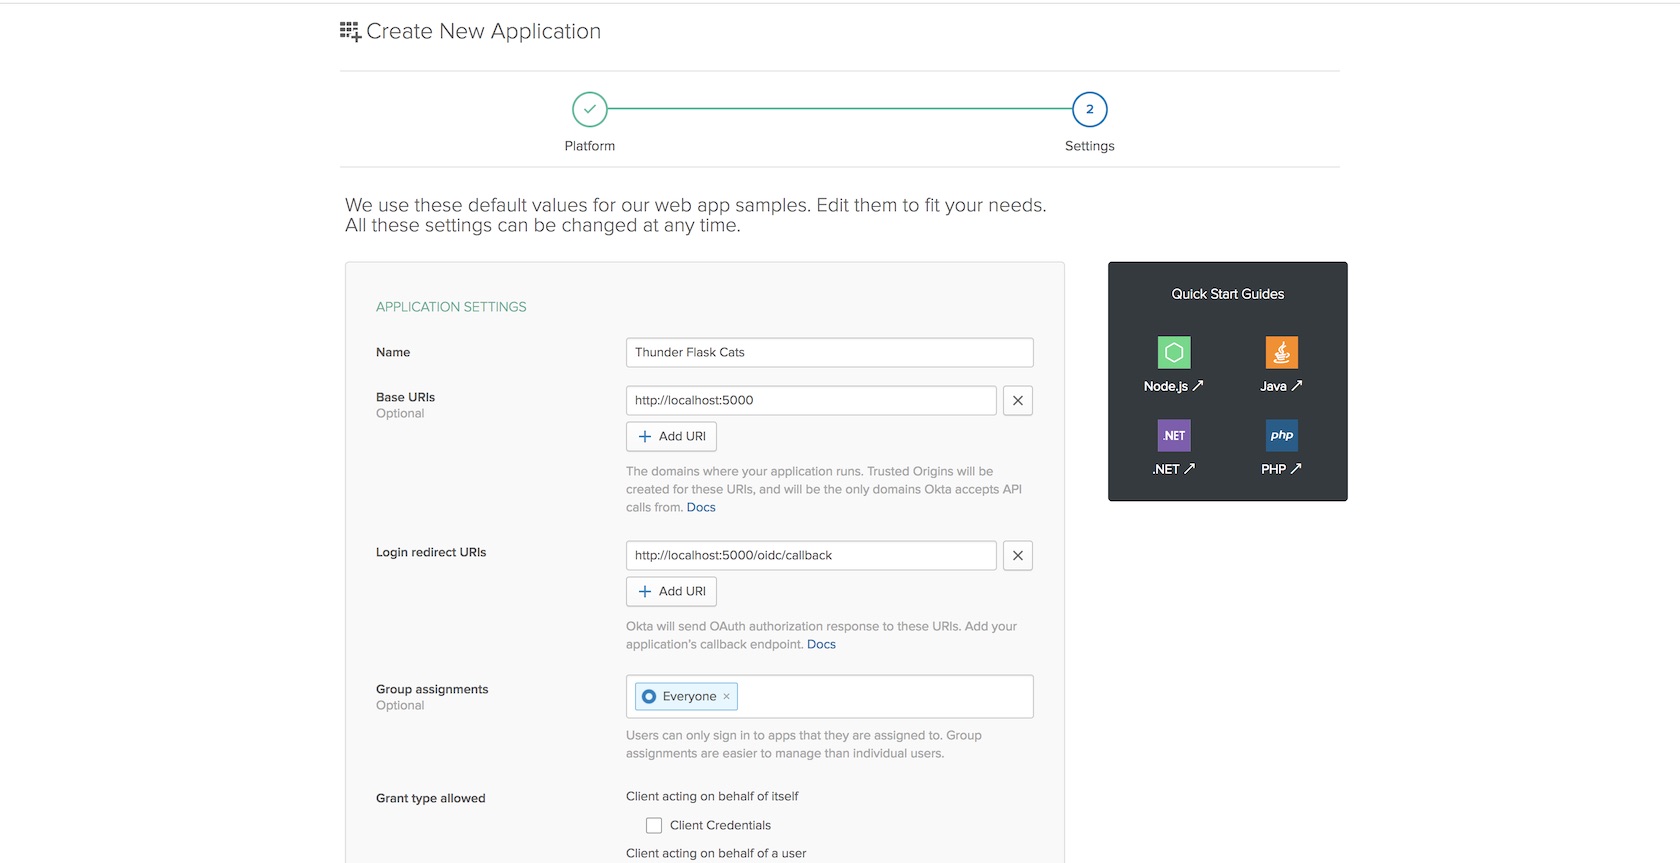
Those are the three values you need to fill in for now so save the application to create it.
On the next page scroll down to find your client and secret keys.

Copy and paste the client ID and client secret into the following
highlighted lines to replace the {{ OKTA_CLIENT_ID }} and
{{ OKTA_CLIENT_SECRET }} placeholders.
{
  "web": {
    "client_id": "{{ OKTA_CLIENT_ID }}",
    "client_secret": "{{ OKTA_CLIENT_SECRET }}",
    "auth_uri": "https://dev-860408.oktapreview.com/oauth2/default/v1/authorize",
    "token_uri": "https://dev-860408.oktapreview.com/oauth2/default/v1/token",
    "issuer": "https://dev-860408.oktapreview.com/oauth2/default",
    "userinfo_uri": "https://dev-860408.oktapreview.com/oauth2/default/userinfo",
    "redirect_uris": [
      "http://localhost:5000/oidc/callback"
    ]
  }
}
Save the file and make sure to keep it out of version control as those secret values need to stay secret.
We have one more step in the Okta developer dashboard before we upgrade our Flask application with the authentication code: creating an API authentication token. Go to the API tab.

Click the "Create Token" button.
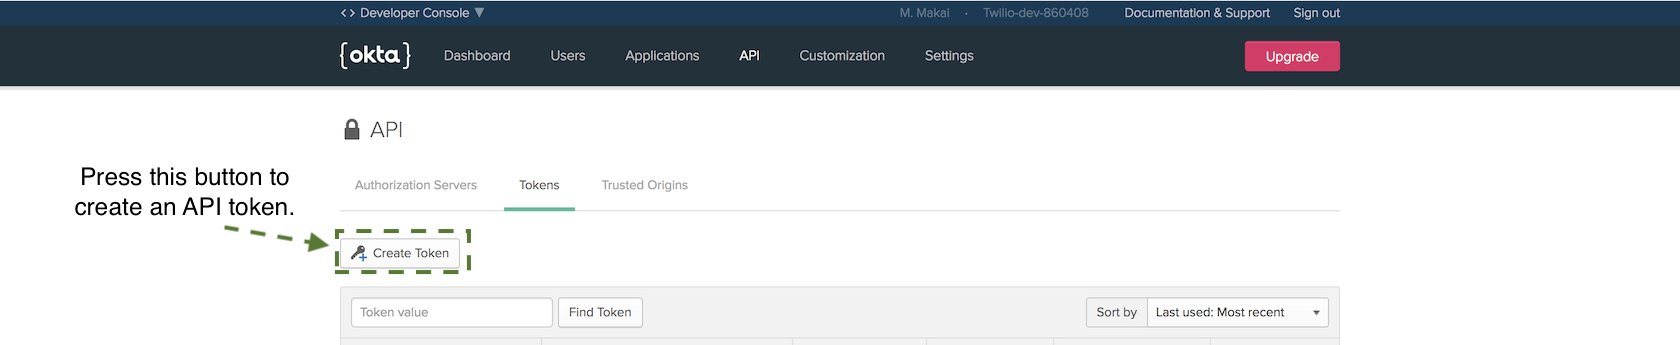
Name the token FlaskToken and copy it. Save the token somewhere
safe as we will not be able to access it through the dashboard again. We
are going to use this token when setting the OKTA_AUTH_TOKEN environment
variable in the next section of this tutorial.
Okay, we finally have all the Okta service configuration and tokens in
our openidconnect_secret.json file that we need to finish our application.
Update app/__init__.py with these highlighted lines:
import redis
from os import environ
from flask import Flask
from app.utils import make_celery
from config import Config
from flask_sqlalchemy import SQLAlchemy
from flask_migrate import Migrate
from flask_oidc import OpenIDConnect
from okta import UsersClient


app = Flask(__name__, static_url_path='/static')
app.config.from_object(Config)
db = SQLAlchemy(app)
migrate = Migrate(app, db)

# connect to Redis instance
redis_db = redis.StrictRedis(host=app.config['REDIS_SERVER'],
                             port=app.config['REDIS_PORT'],
                             db=app.config['REDIS_DB'])
celery = make_celery(app)


# instantiate OpenID client to handle user session
oidc = OpenIDConnect(app)
# Okta client will determine if a user has an appropriate account
okta_client = UsersClient(environ.get("OKTA_ORG_URL"),
                          environ.get("OKTA_AUTH_TOKEN"))


from app import routes
We can now access the okta_client in our routes. Open app/routes.py
and update the following lines:
from flask import send_from_directory, render_template
from flask import redirect, g
from app import app, oidc, okta_client


@app.before_request
def before_request():
    if oidc.user_loggedin:
        g.user = okta_client.get_user(oidc.user_getfield("sub"))
    else:
        g.user = None


@app.route('/js/<path:path>')
def send_js(path):
    return send_from_directory('js', path)


@app.route('/css/<path:path>')
def send_css(path):
    return send_from_directory('css', path)


@app.route("/")
def dashboard():
    return render_template('dashboard.html')


@app.route("/repositories")
@oidc.require_login
def repositories():
    return render_template('repositories.html')


@app.route("/login")
@oidc.require_login
def login():
    return redirect(url_for(".repositories"))


@app.route("/logout")
def logout():
    oidc.logout()
    return redirect(url_for(".landing_page"))
The above new highlighted lines check whether or not a user is logged in
before each request. If a route requires a logged in user due to the
@oidc.require_login decorator then the user will be redirect to the
sign in page. We also added routes under /login and /logout to make
it possible to log in and out of the application.
Set three environment variables so our application can use them when we
run it. Make sure the placeholders ORG_URL and AUTH_TOKEN are set with
your actual Org URL value and auth token from the Okta developer dashboard.
On the command line run the following commands, making sure to replace any placeholder values with your own tokens and URLs:
# this tells Flask we want to run the built-in server in dev mode
export FLASK_ENV=development
# make sure to use a very long random string here that cannot be guessed
export SECRET_KEY='a very long string with lots of numbers and letters'
# this is the same Org URL found on your developer dashboard
# for example, https://dev-860408.oktapreview.com
export OKTA_ORG_URL='ORG_URL'
# this is the API authentication token we created
export OKTA_AUTH_TOKEN='AUTH_TOKEN'
Now re-run the Flask application:
set FLASK_APP=app.py
flask run
You should be in good shape if the development server starts up with output like this:
(flaskauth)$ flask run
 * Environment: development
 * Debug mode: on
 * Running on http://127.0.0.1:5000/ (Press CTRL+C to quit)
 * Restarting with stat
 * Debugger is active!
 * Debugger PIN: 415-920-546
Head to localhost:5000 in a browser where you are not already logged into your Okta account (an incognito window of your web browser works great).

Let's test the redirect functionality when we try to go to the /dashboard
route by going to localhost:5000/repositories. We get redirected to the Okta
login page.

Enter your Okta developer username and password to log into your application. For development purposes this will work fine for testing but obviously in a production application you will create other accounts for users to log into.
To unauthenticate your user go to localhost:5000/logout. When you go back to localhost:5000/repositories again you will now have to re-authenticate.
What Now?
We configured an existing Flask application to use Okta for user authentication and identity management via the Okta API.
Next you can try one of the following tutorials to add other features to the Flask application:
- How to Add Hosted Monitoring to Flask Web Applications
- Develop and Run Flask Apps within Docker Containers
- Responding to SMS Text Messages with Python & Flask
You can also determine what to code next in your Python project by reading the Full Stack Python table of contents page.
Questions? Contact me via Twitter @fullstackpython or @mattmakai. I am also on GitHub with the username mattmakai.
Something wrong with this post? Fork this page's source on GitHub and submit a pull request.