Higher Accuracy Twilio Voice Transcriptions with Python and Flask
Twilio's Programmable Voice API is commonly used to initiate and receive phone calls, but the transcription accuracy for recordings often leaves a lot to be desired. In this tutorial, we'll see how to connect an outbound phone call powered by the Twilio Voice API with AssemblyAI's deep learning transcription API to get significantly more accurate speech-to-text output.
Required Tools for this Application
Ensure you have Python 3 installed, because Python 2 reached its end-of-life at the beginning of 2020 and is no longer supported. Preferrably, you should have Python 3.6 or newer installed in your development environment. This tutorial will also use:
We will use the following dependencies to complete this tutorial:
- requests, version 2.24.0, for accessing the AssemblyAI transcription API
- Flask, version 1.1.2, to respond to Twilio's webhooks
- A Twilio account, of which a free trial version is good enough to test this tutorial
- Twilio Python helper library, version 6.45.4 or newer, for interacting with the REST API
- An AssemblyAI account, which you can sign up for a free key API access key here
- Ngrok if you need a localhost tunnel to expose a public URL that webhooks can send a POST request to
All code in this blog post is available open source under the MIT license on GitHub under the accurate-twilio-voice-call-recording-transcriptions-assemblyai directory of the blog-code-examples repository. Use the source code as you desire for your own projects.
Configuring our development environment
Change into the directory where you keep your Python virtual environments. Create a new virtualenv for this project using the following command.
Start this Python project by creating a new
virtual environment
using the following command. I recommend using a separate directory
such as ~/venvs/ (the tilde is a shortcut for your user's home
directory) so that you always know where all your virtualenvs are
located.
python3 -m venv ~/venvs/record-transcribe
Activate the virtualenv with the activate shell script:
source ~/venvs/record-transcribe/bin/activate
After the above command is executed, the command prompt will
change so that the name of the virtualenv is prepended to the
original command prompt format, so if your prompt is simply
$, it will now look like the following:
(record-transcribe) $
Remember, you have to activate your virtualenv in every new terminal window where you want to use dependencies in the virtualenv.
We can now install the required packages package into the activated but otherwise empty virtualenv.
pip install Flask==1.1.2 requests==2.24.0 twilio==6.45.4
Look for output similar to the following to confirm the appropriate packages were installed correctly from PyPI.
(recordtranscribe) $ pip install Flask==1.1.2 requests==2.24.0 twilio=6.45.4
Collecting Flask
  Using cached https://files.pythonhosted.org/packages/f2/28/2a03252dfb9ebf377f40fba6a7841b47083260bf8bd8e737b0c6952df83f/Flask-1.1.2-py2.py3-none-any.whl
Collecting requests
  Using cached https://files.pythonhosted.org/packages/45/1e/0c169c6a5381e241ba7404532c16a21d86ab872c9bed8bdcd4c423954103/requests-2.24.0-py2.py3-none-any.whl
Collecting twilio
  Using cached https://files.pythonhosted.org/packages/d0/4e/7c377eb1a1d57f011dc1bee2fee77cf1e9a08407b8d44ea25a187a30c78d/twilio-6.45.4.tar.gz
Collecting Werkzeug>=0.15 (from Flask)
  Using cached https://files.pythonhosted.org/packages/cc/94/5f7079a0e00bd6863ef8f1da638721e9da21e5bacee597595b318f71d62e/Werkzeug-1.0.1-py2.py3-none-any.whl
Collecting itsdangerous>=0.24 (from Flask)
  Using cached https://files.pythonhosted.org/packages/76/ae/44b03b253d6fade317f32c24d100b3b35c2239807046a4c953c7b89fa49e/itsdangerous-1.1.0-py2.py3-none-any.whl
Collecting click>=5.1 (from Flask)
  Using cached https://files.pythonhosted.org/packages/d2/3d/fa76db83bf75c4f8d338c2fd15c8d33fdd7ad23a9b5e57eb6c5de26b430e/click-7.1.2-py2.py3-none-any.whl
Collecting Jinja2>=2.10.1 (from Flask)
  Using cached https://files.pythonhosted.org/packages/30/9e/f663a2aa66a09d838042ae1a2c5659828bb9b41ea3a6efa20a20fd92b121/Jinja2-2.11.2-py2.py3-none-any.whl
Collecting urllib3!=1.25.0,!=1.25.1,<1.26,>=1.21.1 (from requests)
  Using cached https://files.pythonhosted.org/packages/9f/f0/a391d1463ebb1b233795cabfc0ef38d3db4442339de68f847026199e69d7/urllib3-1.25.10-py2.py3-none-any.whl
Collecting idna<3,>=2.5 (from requests)
  Using cached https://files.pythonhosted.org/packages/a2/38/928ddce2273eaa564f6f50de919327bf3a00f091b5baba8dfa9460f3a8a8/idna-2.10-py2.py3-none-any.whl
Collecting certifi>=2017.4.17 (from requests)
  Using cached https://files.pythonhosted.org/packages/5e/c4/6c4fe722df5343c33226f0b4e0bb042e4dc13483228b4718baf286f86d87/certifi-2020.6.20-py2.py3-none-any.whl
Collecting chardet<4,>=3.0.2 (from requests)
  Using cached https://files.pythonhosted.org/packages/bc/a9/01ffebfb562e4274b6487b4bb1ddec7ca55ec7510b22e4c51f14098443b8/chardet-3.0.4-py2.py3-none-any.whl
Collecting six (from twilio)
  Using cached https://files.pythonhosted.org/packages/ee/ff/48bde5c0f013094d729fe4b0316ba2a24774b3ff1c52d924a8a4cb04078a/six-1.15.0-py2.py3-none-any.whl
Collecting pytz (from twilio)
  Using cached https://files.pythonhosted.org/packages/4f/a4/879454d49688e2fad93e59d7d4efda580b783c745fd2ec2a3adf87b0808d/pytz-2020.1-py2.py3-none-any.whl
Collecting PyJWT>=1.4.2 (from twilio)
  Using cached https://files.pythonhosted.org/packages/87/8b/6a9f14b5f781697e51259d81657e6048fd31a113229cf346880bb7545565/PyJWT-1.7.1-py2.py3-none-any.whl
Collecting MarkupSafe>=0.23 (from Jinja2>=2.10.1->Flask)
  Using cached https://files.pythonhosted.org/packages/0c/12/37f68957526d1ec0883b521934b4e1b8ff3dd8e4fab858a5bf3e487bcee9/MarkupSafe-1.1.1-cp38-cp38-macosx_10_9_x86_64.whl
Installing collected packages: Werkzeug, itsdangerous, click, MarkupSafe, Jinja2, Flask, urllib3, idna, certifi, chardet, requests, six, pytz, PyJWT, twilio
  Running setup.py install for twilio ... done
Successfully installed Flask-1.1.2 Jinja2-2.11.2 MarkupSafe-1.1.1 PyJWT-1.7.1 Werkzeug-1.0.1 certifi-2020.6.20 chardet-3.0.4 click-7.1.2 idna-2.10 itsdangerous-1.1.0 pytz-2020.1 requests-2.24.0 six-1.15.0 twilio-6.45.4 urllib3-1.25.10
We can get started coding the application now that we have all of our required dependencies installed.
Building our application
Time to dig into the code! We're going to write three source files in this application:
app.py: a Flask app that will handle the phone call and recordingtranscribe.py: a short Python script to invoke AssemblyAI with the recording and start the transcription processprint_transcription.py: a script to print the output of the transcription to the terminal
Remember that you can get access to all three of the completed files in the
accurate-twilio-voice-call-recording-transcriptions-assemblyai directory
of the
blog-code-examples
Git repository if you do not want to type or copy from the blog post
itself.
Create a new directory named record-transcribe to store your source files
and change into the new directory.
mkdir record-transcribe
cd record-transcribe
Create a new file named app.py with the following code:
import os
from flask import Flask, request
from twilio.twiml.voice_response import VoiceResponse
from twilio.rest import Client


app = Flask(__name__)

# pulls credentials from environment variables
client = Client()

BASE_URL = os.getenv("BASE_URL")
twiml_instructions_url = "{}/record".format(BASE_URL)
recording_callback_url = "{}/callback".format(BASE_URL)
twilio_phone_number = os.getenv("TWILIO_PHONE_NUMBER")


@app.route("/record", methods=["GET", "POST"])
def record():
    """Returns TwiML which prompts the caller to record a message"""
    # Start our TwiML response
    response = VoiceResponse()

    # Use <Say> to give the caller some instructions
    response.say('Ahoy! Call recording starts now.')

    # Use <Record> to record the caller's message
    response.record()

    # End the call with <Hangup>
    response.hangup()

    return str(response)
There are a couple more functions we'll need to add to app.py but first
let's take a look at what the above code does.
We imported parts of both the Flask and Twilio helper libraries, which will
enable us to programmatically create and control phone calls that Twilio
records. Note that when we instantiate the Twilio helper library with the
empty Client() constructor, it automatically looks to read two environment
variables, TWILIO_ACCOUNT_SID and TWILIO_AUTH_TOKEN to gain appropriate
permissions to your Twilio account. If those two environment variables
are not set with those exact names then you will need to explicitly pass
the Account SID and Auth Token for your account into the constructor.
After the import are the Flask and Twilio library instantiations.
Then we configure the BASE_URL by reading from an environment variable.
In this tutorial the BASE_URL will be from Ngrok, but it can also
be your domain where your application is deployed, such as
"https://www.twilio.com". We have not yet set these environment variables,
but we will shortly after we finish writing app.py.
After setting BASE_URL, and the three other variables set by environment
variables, we have the record function. This function is a
Flask route that
generates the TwiML
that tells Twilio how to handle a phone call. First, an automated voice
alerts the person who picks up that the phone call is being recorded. Then
the recording starts. Whatever the person on the call says will be recorded
and stored by Twilio.
Finish app.py by adding these two following functions after the
record function:
@app.route("/dial/<int:phone_number>")
def dial(phone_number):
    """Dials an outbound phone call to the number in the URL. Just
    as a heads up you will never want to leave a URL like this exposed
    without authentication and further phone number format verification.
    phone_number should be just the digits with the country code first,
    for example 14155559812."""
    call = client.calls.create(
            to='+{}'.format(phone_number),
            from_=twilio_phone_number,
            url=twiml_instructions_url,
    )
    print(call.sid)
    return "dialing +{}. call SID is: {}".format(phone_number, call.sid)


@app.route("/get-recording-url/<call_sid>")
def get_recording_url(call_sid):
    recording_urls = ""
    call = client.calls.get(call_sid)
    for r in call.recordings.list():
        recording_urls="\n".join([recording_urls, r.uri])
    return str(recording_urls)
The dial function creates a Flask route that takes a phone number
input as part of the second level path. Note that in a production
application you must have better phone number validation or you
will have a security issue with unsanitized inputs. We are doing
this here to easily grab a phone number as input rather than having
to build a whole user interface with an HTML form just to grab a
phone number. dial calls the
Twilio Voice API using our
Twilio account credentials so that we can dial an outbound phone
call to the number sent in through the URL. The twiml_instructions_url
should be set to the record function URL so that it can give the
proper dialing and recording TwiML instructions for how Twilio's
service should handle dialing the phone call.
Once we dial the outbound phone call, the call SID is printed to the terminal. We'll need that call SID to get the recording after the call is finished.
Our app.py file is all done. We just need to export our environment
variables for our Twilio credentials.
Sign up for Twilio or
log into your existing account.
Once you get to the Twilio Console,
you can obtain your TWILIO_ACCOUNT_SID and TWILIO_AUTH_TOKEN on the
right side of the page:

When you sign up you should have a phone number assigned to your account. You can use that or purchase a new phone number to use.
Set three environment variables with the names TWILIO_ACCOUNT_SID,
TWILIO_AUTH_TOKEN, and TWILIO_PHONE_NUMBER using the export command
in your terminal. Make sure to replace the values with your own Account SID,
Auth Token and Twilio phone number.
export TWILIO_ACCOUNT_SID=xxxxxxxxxxxxx    # found in twilio.com/console
export TWILIO_AUTH_TOKEN=yyyyyyyyyyyyyy    # found in twilio.com/console
export TWILIO_PHONE_NUMBER=+17166382453    # replace with your Twilio number
Note that you must use the export command in every command line window
that you want this key to be accessible. The scripts we are writing will
not be able to access the Twilio APIs if you do not have the tokens exported
in the environment where you are running the script.
There is one more environment variable to set before we can run app.py.
We need to use Ngrok as a localhost tunnel so that Twilio's webhook can
send an HTTP POST request to our app.py Flask application running on
our local development environment.
Run Ngrok in a new terminal window, because you will need to keep it running while we run our other Python code:
./ngrok http 5000
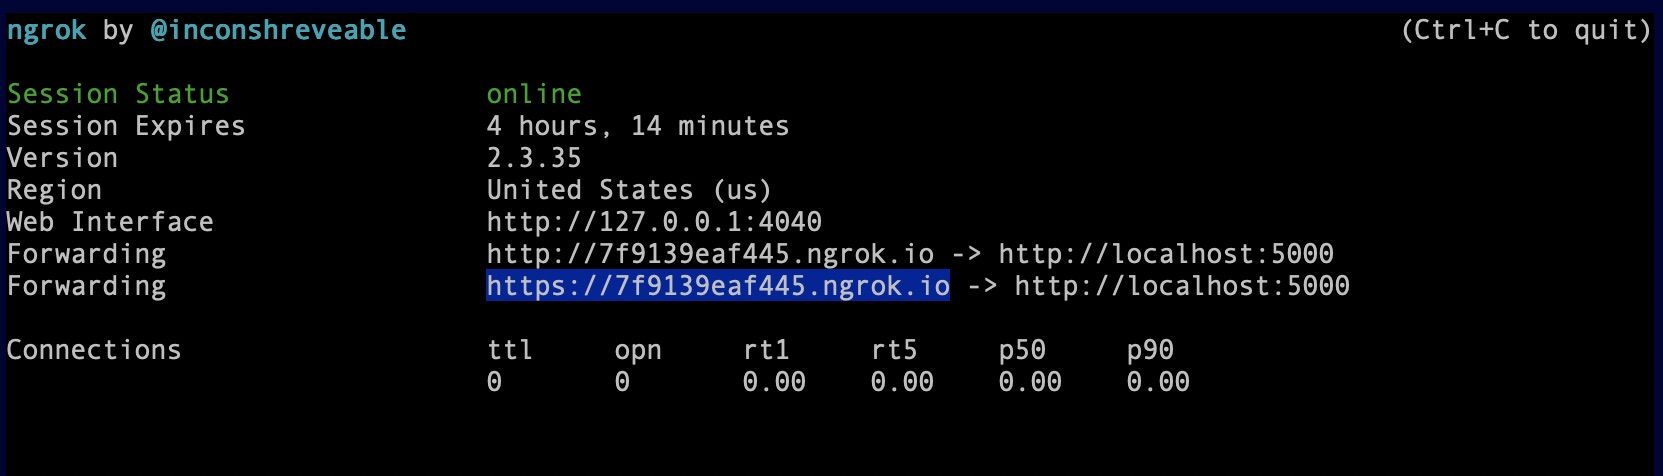
Copy the HTTPS version of the "Forwarding" URL and set the BASE_URL
environment variable value to it. For example, in this screenshot you
would set BASE_URL to https://7f9139eaf445.ngrok.io using the
following command:
export BASE_URL=https://7f9139eaf445.ngrok.io # use your ngrok URL, or domain. no trailing slash
Okay, we can finally run app.py. Make sure you are still running Ngrok
in a different window, your virtualenv is active and that in this terminal
you have your four environment variables set, then run the flask run
command:
flask run
You should see Flask output something like the following text:
 * Environment: production
   WARNING: This is a development server. Do not use it in a production deployment.
   Use a production WSGI server instead.
 * Debug mode: off
 * Running on http://127.0.0.1:5000/ (Press CTRL+C to quit)
That is a legitimate warning: only use this command for development purposes and when you want to deploy to production you need to use a real WSGI server like Gunicorn.
Time to test out our application.
Testing Twilio Programmable Voice Recording
We can test our application by going to localhost on port 5000. Go to this URL in your web browser, replacing the "14155551234" with the phone number you want to call, where the person on the line will be recorded: http://localhost:5000/dial/14155551234.
That number should now receive a phone call from your Twilio number. Pick up, record a message that you want to use to test the transcription, and then hang up.
If you get an error, make sure all of your environment variables are set. You can check the values by using the echo command like this:
echo $BASE_URL
When the call is over, copy the call SID show on the web page so that we can use it to look up where the recording audio file is stored.

Go to "localhost:5000/get-recording-url/" with the call SID at the end. For example, "localhost:5000/get-recording-url/CAda3f2f49ff4e8ef2be6b726edb998c92".

Copy the entire output except for the ".json" at the end, then paste it into the web browser's URL bar, prepended with "api.twilio.com". For example, "https://api.twilio.com/2010-04-01/Accounts/ACe3737affa0d2e17561ad44c9d190e70c/Recordings/RE3b42cf470bef829c3680ded961a09300". This will bring up the recording. Copy the entire URL and we will use it as input into the AssemblyAI service.
Transcribing with the AssemblyAI API
We can now use the AssemblyAI API for speech-to-text transcription on the call recording that was just made.
Sign up for an AssemblyAI account and log in to the AssemblyAI dashboard, then copy "Your API token" as shown in this screenshot:
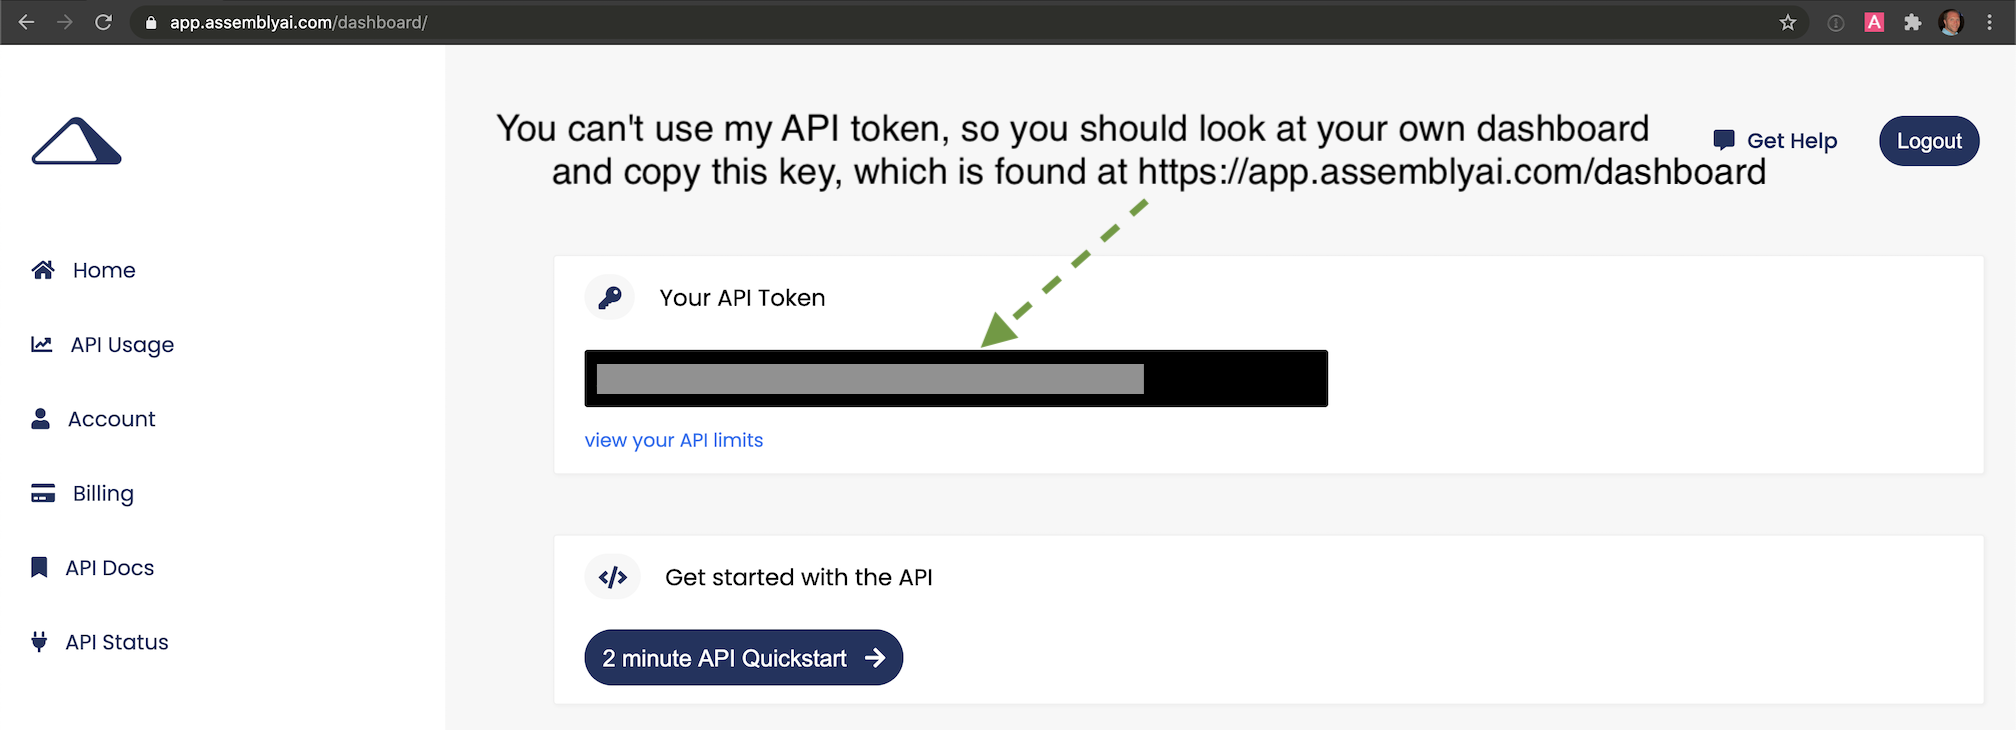
We need to export our AssemblyAI API key as an environment variable so that our Python application can use it to authenticate with their API. We also need to pass the publicly-accessible URL for the recording, so we'll set that as an environment variable as well.
# make sure to replace this URL with the one for your recording
export ASSEMBLYAI_KEY=your-api-key-here
export RECORDING_URL=https://api.twilio.com/2010-04-01/Accounts/ACe3737affa0d2e17561ad44c9d190e70c/Recordings/RE3b42cf470bef829c3680ded961a09300
Create a new file named transcribe.py and write the following code in it:
import os
import requests

endpoint = "https://api.assemblyai.com/v2/transcript"

json = {
  "audio_url": os.getenv("RECORDING_URL")
}

headers = {
    "authorization": os.getenv("ASSEMBLYAI_KEY"),
    "content-type": "application/json"
}

response = requests.post(endpoint, json=json, headers=headers)

print(response.json())
The above code calls the AssemblyAI transcription service using the secret key and passes it the URL with the file recording. The script prints out the JSON response from the service, which will contain a transcription ID that we'll use to access the results after they finish processing.
Run the script using the python command:
python transcribe.py
You will get back some JSON as output, similar what you see here:
{'audio_end_at': None, 'acoustic_model': 'assemblyai_default', 'text': None, 'audio_url': 'https://api.twilio.com/2010-04-01/Accounts/ACe3737affa0d2e17561ad44c9d190e70c/Recordings/RE3b42cf470bef829c3680ded961a09300', 'speed_boost': False, 'language_model': 'assemblyai_default', 'redact_pii': False, 'confidence': None, 'webhook_status_code': None, 'id': 'zibe9vwmx-82ce-476c-85a7-e82c09c67daf', 'status': 'queued',
'boost_param': None, 'words': None, 'format_text': True, 'webhook_url': None, 'punctuate': True, 'utterances': None, 'audio_duration': None, 'auto_highlights': False, 'word_boost': [], 'dual_channel': None, 'audio_start_from': None}
Find the value contained with the id field of the JSON response. We need
that value to look up the final result of our transcription. Copy the
transcription ID and set it as an environment variable to use as input by
the final script:
# replace with what's found within `id` from the JSON response
export TRANSCRIPTION_ID=aksd19vwmx-82ce-476c-85a7-e82c09c67daf
We just need a little more Python that looks up the result and we'll be all done.
Retrieve the AssemblyAI Transcription
AssemblyAI will be busy transcribing the recording. Depending on the size of the file it can take anywhere from a few seconds to a few minutes for the job to complete. We can use the following code to see if the job is still in progress or it has completed. If the transcription is done it will print the results to the terminal.
Create a new file named print_transcription.py with the following code:
import os
import requests

endpoint = "https://api.assemblyai.com/v2/transcript/{}".format(os.getenv("TRANSCRIPTION_ID"))

headers = {
    "authorization": os.getenv("ASSEMBLYAI_KEY"),
}

response = requests.get(endpoint, headers=headers)

print(response.json())
print("\n\n")
print(response.json()['text'])
The code above in print_transcription.py is very similar to the code
in the previous transcribe.py source file. imports os (operating system)
from the Python standard library, as we did in the previous two files,
to obtain the TRANSCRIPTION_ID and ASSEMBLYAI_KEY environment variable
values.
The endpoint is simply the AssemblyAI API endpoint for retrieving
transcriptions. We set the appropriate authorization header and
make the API call using the requests.get function. We then print
out the JSON response as well as just the text that was transcribed.
Time to test out this third file. Execute the following command in the terminal:
python print_transcription.py
Your output will be different based on your recording but you should see a result in the terminal similar to the following:
{'audio_end_at': None, 'acoustic_model': 'assemblyai_default', 'auto_highlights_result': None, 'text': 'An object relational mapper is a code library that automates the transfer of data stored in a relational database tables into objects that are more commonly used in application. Code or MS provide a high level abstraction upon a relational database that allows the developer to write Python code. Instead of sequel to create read update and delete data and schemas in their database developers can use the programming language that they are comfortable with comfortable to work with the database instead of writing sequel statements or short procedures.', 'audio_url': 'https://api.twilio.com/2010-04-01/Accounts/ACe3737affa0d2e17561ad44c9d190e70c/Recordings/RE3b42cf470bef829c3680ded961a09300', 'speed_boost': False, 'language_model': 'assemblyai_default', 'id': 'zibe9vwmx-82ce-476c-85a7-e82c09c67daf', 'confidence': 0.931797752808989, 'webhook_status_code': None, 'status': 'completed', 'boost_param': None, 'redact_pii': False, 'words': [{'text': 'An', 'confidence': 1.0, 'end': 90, 'start': 0}, {'text': 'object', 'confidence': 0.94, 'end': 570, 'start': 210}, {'text': 'relational', 'confidence': 0.89, 'end': 1080, 'start': 510}, {'text': 'mapper', 'confidence': 0.97, 'end': 1380, 'start': 1020}, {'text': 'is', 'confidence': 0.88, 'end': 1560, 'start': 1350}, {'text': 'a', 'confidence': 0.99, 'end': 1620, 'start': 1500}, {'text': 'code', 'confidence': 0.93, 'end': 1920, 'start': 1620}, {'text': 'library', 'confidence': 0.94, 'end': 2250, 'start': 1860}, {'text': 'that', 'confidence': 0.99, 'end': 2490, 'start': 2220}, {'text': 'automates', 'confidence': 0.93, 'end': 2940, 'start': 2430}, {'text': 'the', 'confidence': 0.95, 'end': 3150, 'start': 2910}, {'text': 'transfer', 'confidence': 0.98, 'end': 3510, 'start': 3090}, {'text': 'of', 'confidence':
0.99, 'end': 3660, 'start': 3480}, {'text': 'data', 'confidence': 0.84, 'end': 3960, 'start': 3630}, {'text': 'stored', 'confidence': 0.89, 'end': 4350, 'start': 3900}, {'text': 'in', 'confidence': 0.98, 'end': 4500, 'start': 4290}, {'text': 'a', 'confidence': 0.85, 'end': 4560, 'start': 4440}, {'text': 'relational', 'confidence': 0.87, 'end': 5580, 'start': 4500}, {'text': 'database', 'confidence': 0.92, 'end':
6030, 'start': 5520}, {'text': 'tables', 'confidence': 0.93, 'end': 6330, 'start': 5970}, {'text': 'into', 'confidence': 0.92, 'end': 7130, 'start': 6560}, {'text': 'objects', 'confidence': 0.96, 'end': 7490, 'start': 7100}, {'text': 'that', 'confidence': 0.97, 'end': 7700, 'start': 7430}, {'text': 'are', 'confidence': 0.9, 'end': 7850, 'start': 7640}, {'text': 'more', 'confidence': 0.97, 'end': 8030, 'start': 7790}, {'text': 'commonly', 'confidence': 0.92, 'end': 8480, 'start': 7970}, {'text': 'used', 'confidence': 0.86, 'end': 8750, 'start': 8420}, {'text': 'in', 'confidence': 0.94, 'end': 9050, 'start': 8840}, {'text': 'application.', 'confidence': 0.98, 'end': 9860, 'start': 9110}, {'text': 'Code', 'confidence': 0.93, 'end': 10040, 'start': 9830}, {'text': 'or', 'confidence': 1.0, 'end': 11210, 'start': 10220}, {'text': 'MS', 'confidence': 0.83, 'end': 11480, 'start': 11180}, {'text': 'provide', 'confidence': 0.94, 'end': 11870, 'start': 11510}, {'text': 'a', 'confidence': 1.0, 'end': 11960, 'start': 11840}, {'text': 'high', 'confidence': 1.0, 'end': 12200, 'start': 11930}, {'text': 'level', 'confidence': 0.94, 'end': 12440, 'start': 12170}, {'text': 'abstraction', 'confidence': 0.95, 'end': 12980, 'start': 12410}, {'text':
'upon', 'confidence': 0.94, 'end': 13220, 'start': 12950}, {'text': 'a', 'confidence': 1.0, 'end': 13280, 'start': 13160}, {'text': 'relational', 'confidence': 0.94, 'end': 13820, 'start': 13280}, {'text': 'database', 'confidence': 0.95, 'end': 14210, 'start': 13790}, {'text': 'that', 'confidence': 0.96, 'end': 14420, 'start': 14150}, {'text': 'allows', 'confidence': 0.99, 'end': 14720, 'start': 14360}, {'text':
'the', 'confidence': 0.56, 'end': 14870, 'start': 14690}, {'text': 'developer', 'confidence': 0.98, 'end': 15290, 'start': 14810}, {'text': 'to', 'confidence': 0.94, 'end': 15410, 'start': 15230}, {'text': 'write', 'confidence': 0.96, 'end': 15680, 'start': 15380}, {'text': 'Python', 'confidence': 0.94, 'end': 16070, 'start': 15620}, {'text': 'code.', 'confidence': 0.98, 'end': 16310, 'start': 16070}, {'text': 'Instead', 'confidence': 0.97, 'end': 17160, 'start': 16500}, {'text': 'of', 'confidence': 0.93, 'end': 17340, 'start': 17130}, {'text': 'sequel', 'confidence': 0.86, 'end': 17820, 'start': 17280}, {'text': 'to', 'confidence': 0.91, 'end': 18090, 'start': 17880}, {'text': 'create', 'confidence': 0.89, 'end': 18450, 'start': 18090}, {'text': 'read', 'confidence': 0.88, 'end': 18840, 'start': 18480}, {'text': 'update', 'confidence': 0.92, 'end': 19290, 'start': 18870}, {'text': 'and', 'confidence': 0.94, 'end': 19590, 'start': 19230}, {'text': 'delete', 'confidence': 0.89, 'end': 19920, 'start': 19530}, {'text': 'data',
'confidence': 0.95, 'end': 20190, 'start': 19890}, {'text': 'and', 'confidence': 0.92, 'end': 20490, 'start': 20250}, {'text': 'schemas', 'confidence': 0.86, 'end': 21000, 'start': 20430}, {'text': 'in', 'confidence': 0.94, 'end': 21210, 'start': 21000}, {'text': 'their', 'confidence': 0.98, 'end': 21510, 'start': 21150}, {'text': 'database', 'confidence': 0.97, 'end': 21900, 'start': 21450}, {'text': 'developers', 'confidence': 0.83, 'end': 23200, 'start': 22420}, {'text': 'can', 'confidence': 0.95, 'end': 23440, 'start': 23200}, {'text': 'use', 'confidence': 0.97, 'end': 23650, 'start': 23410}, {'text': 'the', 'confidence': 0.99, 'end': 23890, 'start': 23590}, {'text': 'programming', 'confidence': 0.97, 'end': 24370, 'start': 23830}, {'text': 'language', 'confidence': 1.0, 'end': 24700, 'start': 24310}, {'text': 'that', 'confidence': 1.0, 'end': 24880, 'start': 24640}, {'text': 'they', 'confidence': 0.99, 'end': 25060, 'start': 24820}, {'text': 'are', 'confidence': 0.85, 'end': 25210, 'start': 25000}, {'text': 'comfortable', 'confidence': 0.92, 'end': 25780, 'start': 25180}, {'text': 'with', 'confidence': 1.0, 'end': 25960, 'start': 25720}, {'text': 'comfortable', 'confidence': 0.94, 'end': 29090, 'start': 28090}, {'text': 'to', 'confidence': 0.84, 'end': 29840, 'start': 29180}, {'text': 'work', 'confidence': 0.95, 'end': 30050, 'start': 29780}, {'text': 'with', 'confidence': 0.98, 'end': 30290, 'start': 30020}, {'text': 'the', 'confidence': 0.69, 'end': 30440, 'start': 30230}, {'text': 'database', 'confidence': 0.98, 'end': 30860, 'start': 30380}, {'text': 'instead', 'confidence': 1.0, 'end': 32780, 'start': 31780}, {'text': 'of', 'confidence': 0.98, 'end': 32900, 'start': 32720}, {'text': 'writing', 'confidence': 0.87, 'end': 33320, 'start': 32870}, {'text': 'sequel', 'confidence': 0.88, 'end': 33860, 'start': 33290}, {'text': 'statements', 'confidence': 0.95, 'end': 34310, 'start': 33800}, {'text': 'or', 'confidence': 0.9, 'end': 34460, 'start': 34250}, {'text': 'short', 'confidence': 0.9, 'end': 34790, 'start': 34430}, {'text': 'procedures.', 'confidence': 0.98, 'end': 35270, 'start': 34760}], 'format_text': True, 'webhook_url': None, 'punctuate': True, 'utterances': None, 'audio_duration': 36.288, 'auto_highlights': False, 'word_boost': [],
'dual_channel': None, 'audio_start_from': None}


An object relational mapper is a code library that automates the transfer of data stored in a relational database tables into objects that are more commonly used in application. Code or MS provide a high level abstraction upon a relational database that allows the developer to write Python code. Instead of sequel to create read update and delete data and schemas in their database developers can use the programming language that they are comfortable with comfortable to work with the database instead of writing sequel statements or short procedures.
That's a lot of output. The first part contains the results of the transcription and the confidence in the accuracy of each word transcribed. The second part is just the plain text output from the transcription.
You can take this now take this base code and add it to any application that needs high quality text-to-speech transcription. If the results aren't quite good enough for you, check out this tutorial on boosting accuracy for keywords or phrases as well as better matching your data with topic detection.
What now?
We just finished building a highly accurate transcription application for recordings.
Next, try out some of these other related Python tutorials:
- How to Transcribe Speech Recordings into Text with Python
- Reporting Exceptions in Python Scripts with Sentry
- Basic Data Types in Python: Strings
Questions? Let me know via a GitHub issue ticket on the Full Stack Python repository, on Twitter @fullstackpython or @mattmakai. If you see an issue or error in this tutorial, please fork the source repository on GitHub and submit a pull request with the fix.